Tag: crochet shawl

  • Crochet Shawl Pattern: The Daphne Shawl.

    Crochet Shawl Pattern: The Daphne Shawl.

    This is a free pattern for the Daphne crochet shawl, a half-circle shawl with elegant drape and an optional picot edging. If you’d prefer the ad free version of this pattern, you can get the PDF on Ravelry.

    Simple half circle crochet shawl too make. Free crochet shawl patterns. Fingering weight crochet porjects. eden Cottage Yarns Nateby 4ply. Crochet shawl using mesh stitch crochet. Fishnet stitch crochet shawl.

    The Daphne shawl is a half circle shawl with a generous wingspan for wrapping up or hanging dramatically across your shoulders. Named after my daughter and my favourite author, Daphne Du Maurier, this shawl is more simple than it seems, but still beautiful and unusual. The delicate picot edging adds additional interest if worked in a contrasting colour but it is optional. 

    The pattern is written using US crochet terms throughout. 

    If you don’t know your US/UK crochet terms, there’s a handy guide here.

    Materials needed: 

    • 200g/7oz 800m/875yd of 4ply (fingering weight) yarn such as Nateby 4ply by Eden Cottage Yarns. The colourway here is Thunder on a Merino/Nylon/Stellina sock base. 
    • 20g/0.7oz; 80m/88yds of 4ply (fingering weight yarn for the contrast trim. This shawl uses a 20g mini skein from the RiverKnits indigo gradient set of Bfl minis.
    • 3.75mm hook. (US F/5)

    Gauge: 16dcs across 16 rows in dc on a 4in (10cm) tension square using a 3.75mm (US F/5) hook. 

    Glossary: 

    CcContrast colour
    Ch Chain 
    Ch sp The space in the row below created by previous chains
    Dc US Double crochet
    McMain colour
    SlSlip stitch 
    St(s)Stitch(es)

    Shawl measures: 

    165cm (64”) long and 68cm (27”) deep

    All instructions are given in US crochet terms. 

    Instructions: 

    Yoke: ch 3 will count as first dc of each row starting at row 2

     To create the half circle, we will increase by 7 sts every row. 

    Row 1: With mc, ch 10. Turn

    Row 2: 1 dc into 4th ch from hook. 1dc in every st to end. Ch 3 (7 dc)

    Row 3: Dc in top of last dc *2dc in every st across*. Ch 3 and turn.(14 dc)

    Row 4: Dc in top of last dc. *1 dc in next st, 2dc in next st*. Repeat* ending with 1 dc in last st. Ch 3 and turn. (21dc)

    Row 5:Dc in top of last dc. *1 dc in next 2 sts, 2dc in next st*. Repeat* ending with 1 dc in last 2 sts. Ch 3 and turn (28dc)

    Row 6:Dc in top of last dc. *1 dc in next 3 sts, 2dc in next st*. Repeat* ending with 1 dc in last 3 sts. Ch 3 and turn (35dc)

    Row 7: Dc in top of last dc. *1 dc in next 4 sts, 2dc in next st*. Repeat* ending with 1 dc in last 4 sts. Ch 3 and turn (42dc)

    Row 8: Dc in top of last dc. *1 dc in next 5 sts, 2dc in next st*. Repeat* ending with 1 dc in last 5 sts. Ch 3 and turn (49dc)

    Row 9: Dc in top of last dc. *1 dc in next 6 sts, 2dc in next st*. Repeat* ending with 1 dc in last 6 sts. Ch 3 and turn (56dc)

    Row 10: Dc in top of last dc.*1 dc in next 7 sts, 2dc in next st*. Repeat* ending with 1 dc in last 7 sts. Ch 3 and turn (63dc)

    Row 11: Dc in top of last dc. *1 dc in next 8 sts, 2dc in next st*. Repeat* ending with 1dc in last 8 sts. Ch 3 and turn (70dc)

    Row 12: Dc in top of last dc. *1 dc in next 9 sts, 2dc in next st*. Repeat* ending with 1dc in last 9 sts. Ch 3 and turn (77dc)

    Panel 1 

    Row 1: Dc in top of last dc. *Ch 2, sk 2 and dc in next st*. Repeat * to end 2dc in last dc.  Ch 3. Turn. 

    Row 2: Dc in top of last dc. Ch 2 and dc in next ch sp. Repeat to last ch sp. 2dc in last dc. Ch 3 and turn.  

    Row 3: 2dc in 1st dc, [1dc in next dc, 2dc in next ch sp] repeat [ ] to last st. 2dc in last st. Ch 3, turn. 

    Row 4 & 5: 2dc in 1st dc, dc every dc to last dc. 2dc in last dc. Ch 3 and turn.

    Row 6: 2dc in first dc, 1 dc in next dc, [2dc in next dc, 1 dc in next dc] to last dc, 2dc in last dc. Ch 3 and turn. 

    Panel 2: 

    Row 1: Dc in top of last dc. *Ch 2, sk 2 and dc in next st*. Repeat * to end 2dc in last dc.  Ch 3. Turn. 

    Row 2:Dc in top of last dc. Dc again in same st. Ch 2 and dc in next ch sp. Repeat to last ch sp. 2dc in last dc. Ch 3 and turn.  

    Row 3 and 4: As row 2. 

    Row 5: 2dc in 1st dc, [1dc in next dc, 2dc in next ch sp] repeat [ ] to last st. 2dc in last st. Ch 3, turn. 

    Row 6-7: 2dc in 1st dc, dc every dc to last dc. 2dc in lats ch. Ch 3 and turn.

    Row 8: 2dc in first dc, 1 dc in next dc, [2dc in next dc, 1 dc in next dc] to last dc, 2dc in last dc. Ch 3 and turn.

    Panel 3:

    Row 1:  Dc in top of last dc. *Ch 2, sk 2 and dc in next st*. Repeat * to end 2dc in last dc.  Ch 3. Turn. 

    Row 2: Dc in top of last dc. Dc again in same ch. Ch 2 and dc in next ch sp. Repeat to last ch sp. 2dc in last dc. Ch 3 and turn.  

    Row 3 and 4: As row 2. 

    Row 5: 2dc in 1st dc, [1dc in next dc, 2dc in next ch sp] repeat [ ] to last st. 2dc in last st. Ch 3, turn. 

    Row 6-7: 2dc in 1st dc, dc every dc to last dc. 2dc in lats dc. Ch 3 and turn.

    Row 8: 2dc in first dc, 1 dc in next dc, [2dc in next dc, 1 dc in next dc] to last dc, 2dc in last dc. Ch 3 and turn.

    Panel 4: 

    Row 1:  Dc in top of last dc. *Ch 2, sk 2 and dc in next st*. Repeat * to end 2dc in last dc.  Ch 3. Turn.  

    Row 2: Dc in top of last dc Dc again in same ch. Ch 2 and dc in next ch sp. Repeat to last ch sp. 2dc in last dc. Ch 3 and turn.  

    Row 3 and 4: As row 2. 

    Row 5: 2dc in 1st dc, [1dc in next dc, 2dc in next ch sp] repeat [ ] to last st. 2dc in last st. Ch 3, turn. 

    Row 6-7: 2dc in 1st dc, dc every ch to last dc. 2dc in last ch. Ch 3 and turn.

    Row 8: 2dc in first dc, 1 dc in next dc, [2dc in next dc, 1 dc in next dc] to last dc, 2dc in last dc. Ch 3 and turn.

    Panel 5: 

    Row 1:  Dc in top of last dc. *Ch 2, sk 2 and dc in next st*. Repeat * to end. 2dc in last dc.  Ch 3. Turn.  

    Row 2: Dc in top of last dc. Dc again in same ch. Ch 2 and dc in next ch sp. Repeat to last ch sp. 2dc in last dc. Ch 3 and turn.  

    Row 3 and 4: As row 2. 

    Row 5: 2dc in 1st dc, [1dc in next dc, 2dc in next ch sp] repeat [ ] to last st. 2dc in last st. Ch 3, turn. Fasten off. 

    Edging (optional) 

    Attach cc yarn. Sl into first dc st of shawl edge. Ch2, dc into same st, ch 2 and sl into same st again.. [Sl next 2 dc sts, ch 2, make a dc, ch 2 and sl into same st]. Repeat [ ] to end. Fasten off. 

    Block to measurements and weave in ends. 

    Half circle crochet lace shawl pattern free., Simple shawls to crochet free patterns. Free shawl patterns for crochet. Mesh stitch crochet.
    Easy crochet shawl patterns to make. Crochet shawl pattern pdf free. Lace shawls to crochetl. Crochet half circle wrap.
  • Titania crochet shawl pattern. Free crochet shawl pattern.

    Titania crochet shawl pattern. Free crochet shawl pattern.

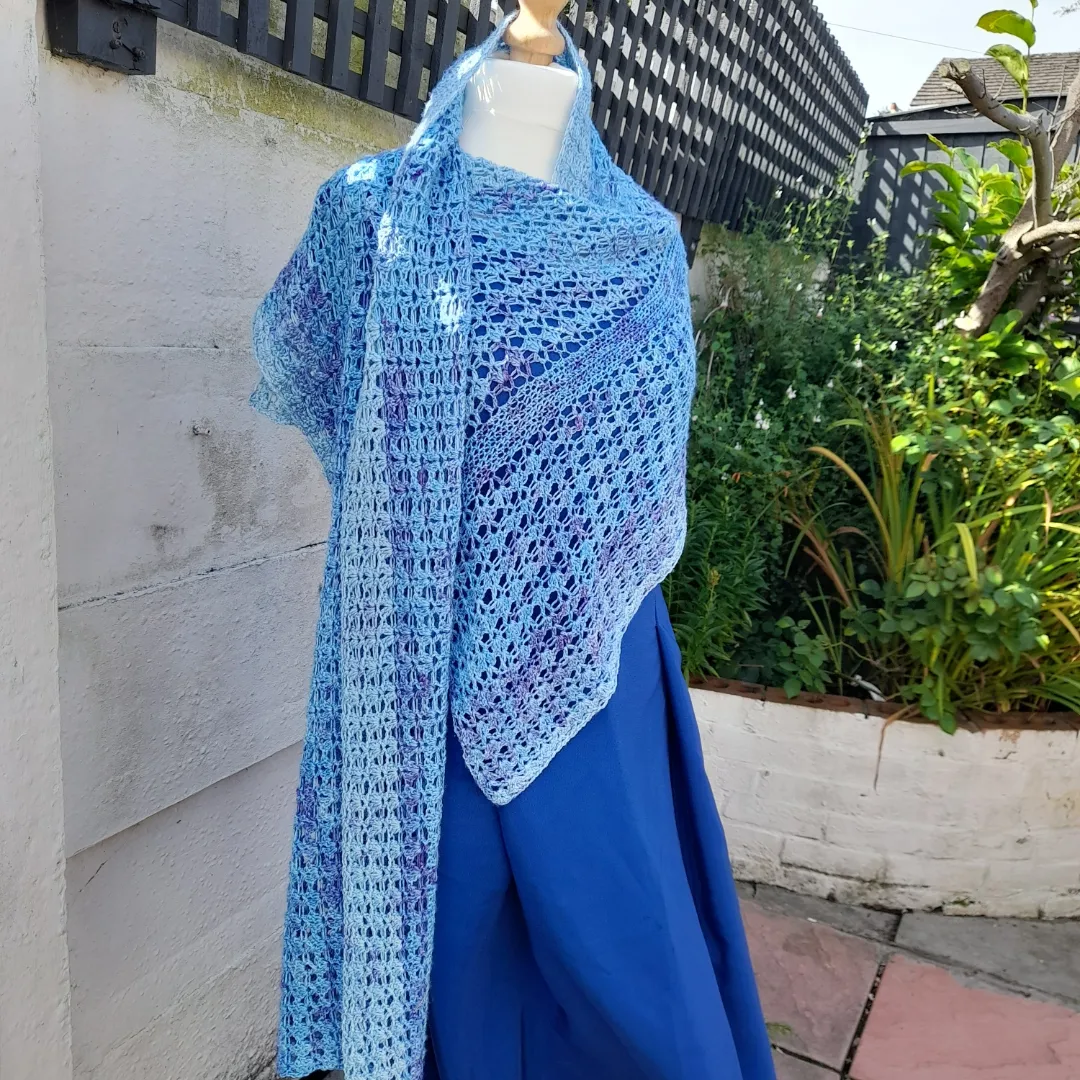
    The Titania shawl crochet pattern is an elegant, lace wrap using 4ply yarn and V stitch to create that airy, lace fabric and elegant drape. This is a free crochet shawl pattern but if you would prefer a PDF with no ads, you can get one from Ravelry or Ko-Fi.

    This article contains affiliate links. If you choose to purchase from the links, I do receive a small commission.

    This is a simple rectangular wrap and is a great project if you have a couple of skeins of a silky yarn. You can find the full pattern below.

    How to make this elegant wrap:

    Welcome autumn with this new crochet rectangular wrap: The Titania crochet shawl. 

    Titania crochet shawl. Long rectangular crochet lace wrap. Free crochet shawl pattern. Crochet shawl pattern free. Easy women crochet scarf.

    Titania crochet shawl pattern

    ©Germander Cottage Crafts

    Pictured: The Titania Crochet Shawl draped over a mannequin’s shoulders. 

    It is a rectangular crochet shawl named after the Queen of the Fairies in Shakespeare’s A Midsummer Night’s Dream. Titania is a graceful, delicate rectangular wrap with the strength and structure to hold up through cooler months. From the Greek meaning “Great One”, Titania is possibly the loveliest crochet piece I feel I have ever designed. 

    What is the difficulty level for this shawl pattern? 

    This is an adventurous beginner pattern, meaning that if you know how to make a chain, make a double crochet stitch (UK treble) and know how to work into the chain space, you can make this shawl.

    If you don’t know how to do those things, here are some helpful posts:

    How big is this shawl? 

    It measures a whopping 19.5in (49.5cm) wide and 80in (204cm) long when blocked. This really will wrap around you. If you know someone who is 6’4, it is the same height as them! 

    What yarn did I use to make the Titania shawl? 

    As with a lot of my designs, the yarn came before the shawl. Sometimes it just tells me what it wants to be. You know how it is with yarn! It has powers. 

    I used a Silk / Bluefaced Leicester blend as both fibres are known for their sheen, strength and drape. This shawl hangs in a way that reminds me of water and its movement. The v stitches create a flower-like shape and run symmetrically either side of the central panel, like a reflection on still water. Feel every bit ethereal when you wear this piece. My shawl was made using The Definitely on purpose Unicorn by Black Stag yarn and fibre. It’s a bluefaced leicster and silk blend 4ply yarn. There;s a 55% Bluefaced Leictester and 45% silk in every skein, so this really is ‘special’ yarn. You can read more about it here.

     Pictured: A close up of The Definitely On Purpose Unicorn. 

    Definitely on purpose unicorn hand dyed silk bloend yarn used for the Titania shawl.

    If you can’t get this yarn, I can recommend some here that will work just as well for the silkiness and the drape:

    Valley Yarns Charlemont: This is 60% Merino Wool 20% Silk 20% Polyamide, 401m (439yds)/100g (3.53oz), 4 Ply and will do the job just as well as the yarn I used for my crochet shawl. It is £16.49 a skein and comes in a range of colours. It is pictured here in Mulberry.

    King Cole Giza Cotton 4ply: This is actually a really lovely, silky cotton yarn with good drape. It doesn’t pill as much as merino based yarns do, so it’s not only a great budget yarn but it’s a good yarn to work with. It’s 100% Cotton, 160m (175yds)/50g (1.76oz), 4 Ply. You will need approximately 5-6 balls of this, but at £3.09 a ball, it’s a great affordable choice, coming in at half the price of the Valley Yarns option.

    Cascade Yarns 220 Fingering: This is another great choice if you’re wanting to use a natural fibre. This is 100% wool and you get 250m (275yd) per 50g skein. You’d therefore need 4 skeins of this to make the shawl. It’s £4.99 a skein, putting it in the mid-range of yarn prices mentioned here.

    An adventurous beginner can create this beautiful shawl as it requires the double crochet stitch and the half double crochet stitch.

    With only a two stitch pattern repeat, this shawl should be nice and repetitive for you to work on. As it works into the chain spaces rather than the chains, it is also speedy compared with crocheting row by row into every stitch. 

    Crochet lace shawl. The Titania crochet lave wrap across shoulders.

    Pictured: The Titania shawl photographed from the back when worn horizontally across the shoulders. 

    Other yarn ideas for the Titania crochet shawl pattern.  

    Let’s have a look at the different yarns that dome of my testers have used already to make this shawl. Below are samples made by my crochet testers. 

    This shawl sample was made by Suzanne (Sluvs2knit on Ravelry) and uses Alize Diva Ombre Batik 7370 which is a 4ply gradient cake yarn. I think it’s worked up beautifully and shows off the shawl’s qualities. 

    A lace shawl hanging from a window. The Titania lace shawl. Alize Diva Ombre batik.

    If you’re looking for something warmer, you could try Eden Cottage Yarns Tempo 4ply as Elsa has used here. This colourway is called Woodland and you can read more about it here.  This is a gorgeous colour and fibre for autumn! I think hand dyed looks exceptional here too. 

    Close up of Tempo 4ply in woodland. Rectangular lace shawl

    Pictured: A close up of the Titania shawl using Tempo 4ply. 

    Titania crochet lace shawl pattern pdf. Easy crochet shawls to make.
    The Titania crochet lace wrap

    I hope you enjoyed seeing the samples from my testers. I certainly did! Which is your favourite? 

    See below for the full crochet shawl pattern.

    Titania 

    Named after the Queen of the Fairies in Shakespeare’s A Midsummer Night’s Dream, Titania is a graceful, delicate rectangular wrap with the strength and structure to hold up through cooler months. From the Greek meaning “Great One”, Titania is possibly the loveliest crochet piece I feel I have ever designed. I chose a Silk / Bluefaced Leicester blend as both fibres are known for their sheen, strength and drape. This shawl hangs in a way that reminds me of water and its movement. The v stitches create a flower-like shape and run symmetrically either side of the central panel, like a reflection on still water. Feel every bit ethereal when you wear this piece.

    An adventurous beginner can create this beautiful shawl as it requires the double crochet stitch and the half double crochet stitch.

    This pattern uses US crochet terms. Please use my handy US/UK crochet terms guide if you’re unsure of anything.

    Glossary 

    ChMake a chain. 
    Ch spChain space. 
    DcDouble crochet. Yarn over, insert hook, yarn over and pull through 2 loops on hook, yarn over and pull through another 2 loops on hook. 
    HdcHalf double crochet. Yarn over, insert hook, yarn over and pull through 3 loops on hook. 
    Sk Skip the next stitch(es).
    St(s)Stitch(es).
    V stMake a double crochet stitch, chain 1 and make another double crochet stitch into the same chain or chain space. 
    Dbl v stMake 2 double crochet stitches into the chain space, chain 1 and make 2 more double crochet stitches into the same space. 

    Materials: 

    • Black Stag Yarns The definitely on purpose Unicorn – BFL/Silk Fibre: 55% Superwash Blue Faced Leicester, 45% Silk; 4 ply, 438 yards / 400m per 3.5 oz / 100g skein. 3 skeins. 
    • G-7 (4.5mm) crochet hook or size needed to obtain gauge. 

    Gauge 

    4.5 dbl v sts and 9 rows to 4 in / 10cm gauge square using G-7 (4.5mm) hook. 

    Finished measurements when blocked

    19.5in (49.5cm) wide and 80in (204cm) long. 

    Notes: 

    Always ch 2 before starting a hdc row, and ch 3 when starting a v stitch row. Every row ends with an individual Dc st to help the shawl maintain a rectangular shape. 

    All terms are given in US terminology. 

    The shawl is worked horizontally beginning with the hdc centre panel. After one side of the pattern is worked, we work into the base of the centre stitches on the other side of the work. This creates the symmetrical effect.

    Instructions 

    Starting with centre panel, ch 244 (2 chs count as turning ch)

    Turn.  

    (Alternatively, work a hdc chainless foundation row of 242 sts.) 

    Starting with the 4th ch from hook, work 242 hdc. Ch 2 (counts as first st) turn. 

    Work four more hdc rows in the same way (242 sts and 5 rows in total). On the final row, do not ch 2. 

    Row 1: Ch 3 (counts as edge Dc), turn, Sk 2, v st in next ch, *Sk 2, v st in next ch; repeat from * to last 3 chs. Sk 2 and Dc in last ch. Ch 3, turn. 

    Row 2: Dbl v st into every v st ch sp. Work one Dc into last st. Ch 3, turn. 

    Row 3: V st into every ch sp along, ending with a Dc in last st. Ch 3, turn.

    Row 4: As Row 2. 

    Repeat Rows 3-4 eight more times. 

    Finish with one more v st row. Fasten off. 

    Turn piece around and rejoin yarn to the first hdc st of the first row. Ch 3. 

    Working into the base of the first hdc row:

    Row 1: V st in 7th ch from hook (ch 3 counts as edge Dc), *sk 2, v st in next ch; repeat from * to last 3 chs. Sk 2 and Dc in last ch. Ch 3, turn. 

    Row 2: Dbl v st into every v st ch sp. Work one Dc into last st. Ch 3, turn. 

    Row 3: V st into every ch sp along, ending with a Dc in last st. Ch 3, turn. 

    Row 4: As Row 2. 

    Repeat Rows 3-4 eight more times. 

    Finish with one more v st row. Fasten off. 

    Finishing 

    Weave in ends and pin out to measurements shown.