Author: Hanna Gough

  • How To Join Granny Squares

    How To Join Granny Squares

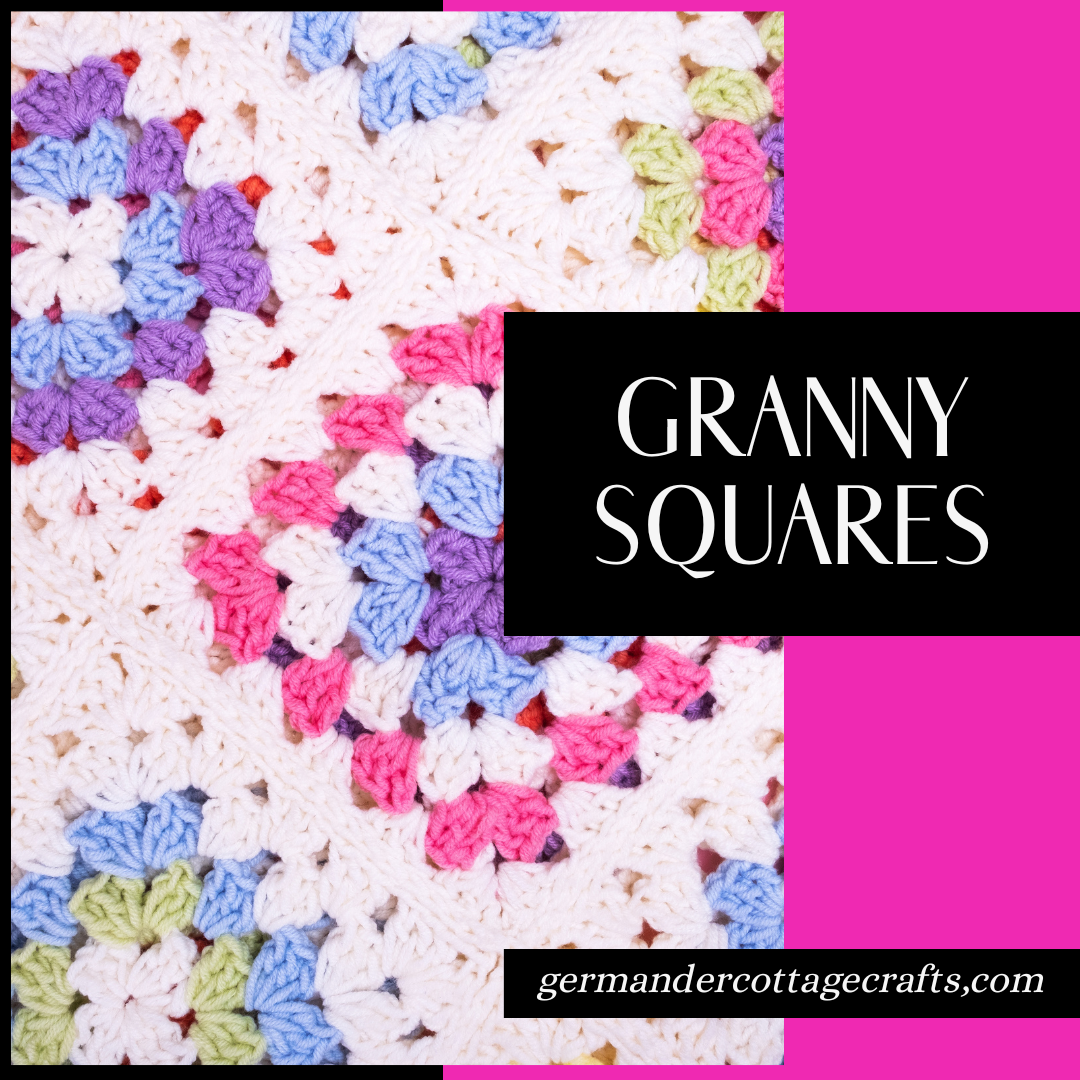
    How to join your granny squares and turn that pile into something that screams “cottage core style” 

    So you’ve mastered the granny square (amazing!) but now you have mountains of squares and don’t know what’s next. Here I will show you how to join your granny squares (or any other squares) using my two favourite methods. This can be a fun experience as you can use your newly discovered methods to seam crochet garments, knit garments and other accessories. 

    For the sake of demonstration, I’ve used different coloured squares and a contrasting yarn colour for the seam. This is just so I can show you how to do it clearly. You can use any squares you like. You can also use the tail end yarns from your squares. It saves weaving them in!

    2 types of join you could try for your granny squares or knitted squares. 

    For both methods I am about to show you: identify the corner. That is where you will start. If the corner isn’t aligned, you won’t match the sides. Try using a removable stitch marker such as a bulb pin to hold the corners together. There’s no escape then!

    These two methods can be used for both crochet squares and knit squares. They are a pleasant alternative to seaming with a darning needle as you only need a hook. Remember to fasten off and knot the yarn when you’ve finished, otherwise it will come apart. 

    The Slip Stitch Join Method 

    Joining granny squares

    This is a method where you hold right sides together and slip stitch across the edges. One side will have a ridge (wrong side) and the other will have an almost invisible join. This is a popular method for those of us who love the right side to be completely flat. It’s a brilliant alternative to blanket mattress stitch as it looks the same without the sewing. 

    The ridge is pretty but it will be on the wrong side of the work. If you want a ridge on the right side of your work, join wrong sides together. 

    How to start the slip stitch join

    Step 1: 

    To do the slip stitch join, first lay your pieces right sides together. Match the squares up as best you can. You can use removable stitch markers to help keep the stitches together, if it helps. 

    If you lay them flat you will see a bottom row of ‘vs’ and a top row of ‘vs’. these are the tops of the stitches, also referred to as chains in some patterns. Here I’m demonstrating with a classic granny square duo. 
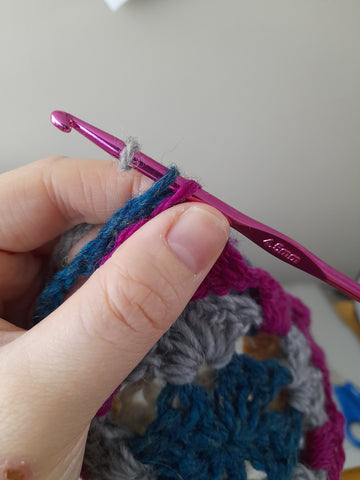
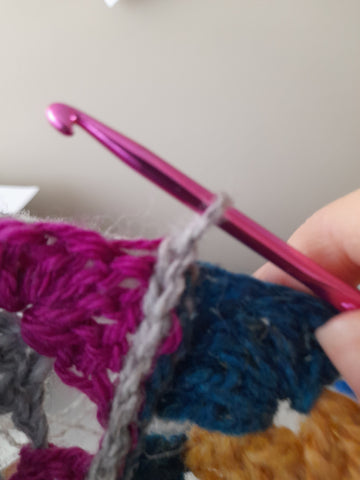
    Step 2: 

    Slip your hook into the first pair of loops. These consist of the outer loop of the bottom square (pink) and the top square (blue).

    Are you left or right handed? Note here that I have started with the right corner of the joined piece. I’m working right to left here because I am demonstrating right handed. 

    If you are left handed, you would be starting at the opposite corner on the left, working left to right. You will still be working with the same loops in the same order. 
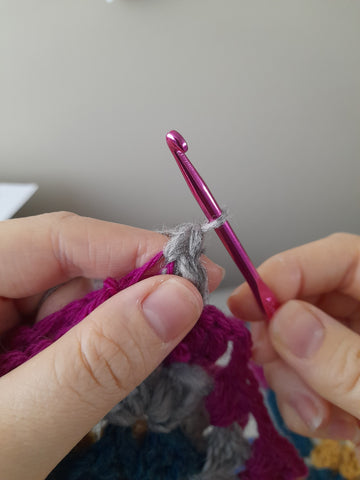
    Step 3:

    Yarn over and pull your hook hook through both of these loops. Make sure they are the outer loops, not the inner loops. If you slip through the inner loops, you’ll see the contrasting yarn on the other side. There’s no point in stressing here as you can just pull it back and try again if you make a mistake. 

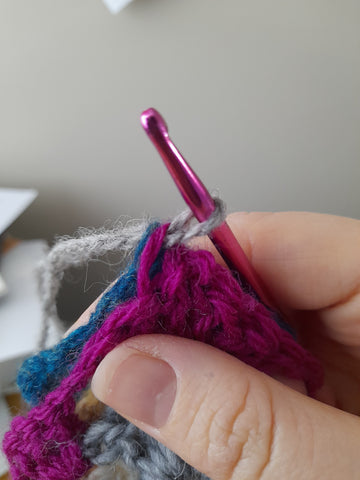
    First slip stitch done! 

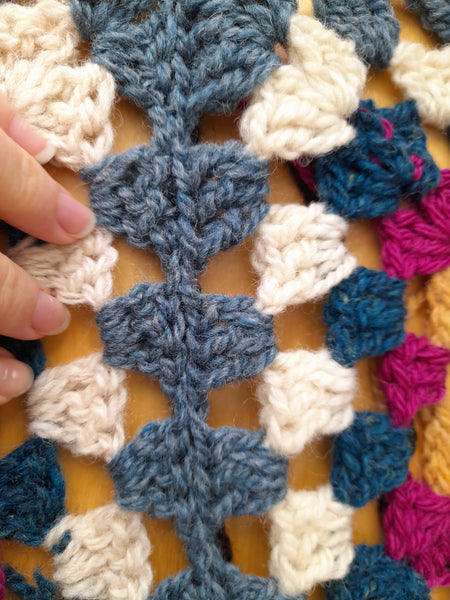
    Repeat this method to the end of the top of these squares. As you work across, you’ll see the slipped stitches making this pretty chain stitch. This will be the wrong side of the work. 

    When you turn the piece over to see the right side, you should barely be able to see the contrasting yarn. 

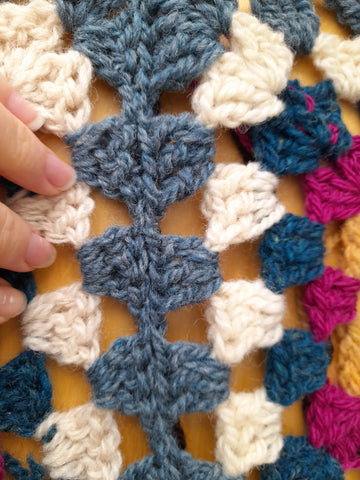
    There is a black contrasting yarn under these stitches. You can barely see it! 

    How to do the single crochet join: 

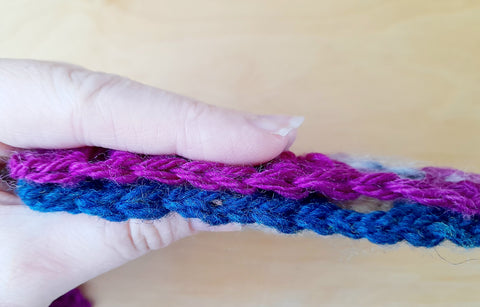
    This join starts out as though it will become a slip stitch join, but before you do the slip, you make a single crochet (UK treble). The other main difference is that the wrong sides are together. The single crochet adds a pretty ridge to the right side. We want people to see it. 

    Here’s how it’s done: 

    Work as instructed for step 1-2 of the slip stitch join above but this time, join wrong sides together. When you pull through after the yarn over, only pull through 1 loop. 

    Yarn over and pull through 2 loops on hook. That’s it. That’s the single crochet join. If your join looks like the seam above, then you’ve missed one of these steps. 

    As the single crochet join adds a ridge to the right side of the blanket, you may want to use a matching colour or a contrasting colour. 

    The single crochet join should look obvious. It should be raised. 

    ridge on the wrong side of the joined blanket

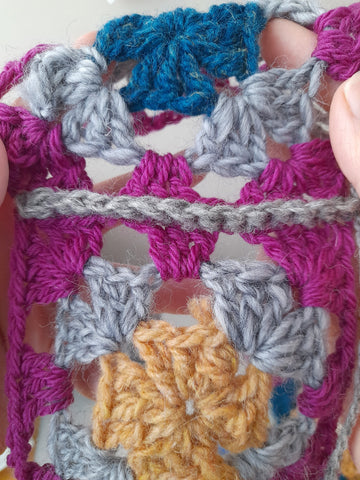
    Single crochet join (pictured). 

    If you want to see a quick video demonstration of the slip stitch join, head over to my Youtube to see it. Really appreciate the help? Why not like and subscribe?

  • Knitting Needle Sizes: Old And New

    Welcome to my knitting for beginners blog series. If you’ve been handed any vintage patterns lately, you may find that the needle sizes do not correspond with the new needle set you’ve just picked up! Below you’ll find a simple chart showing you the old, new and alternative sizes for your knitting needles.

    Knitting needle sizes old and new: everything you need to know. 

    What are old UK sizes?

    As you can see from the conversion chart below, the larger the needle, the smaller the size of needle. If you have inherited any Aero knitting needles from an older friend or relative, they might be size 8s or size 10s. Generally speaking, in most 20th century knitting bags, you’d find 10 for the ribbing (3.25mm) and 8 for the body of the DK weight garment. You are more likely to find 9s and 11s in there too, because 4ply used to be the most common yarn weight out there. 

    What are US needle sizes? 

    US needle sizes go up in size to correspond with the thickness of the needle, which is logical when looking at it. They start at 0 (2mm) and scale up to 15 (10mm). 

    Vintage patterns and old UK needles: 

    If you are working with vintage patterns you will see that they ask for the old UK size needles. You will need to know what the modern equivalent is in today’s needles in order to even work up a swatch! 

    Patterns and old UK needle sizes

    New needles: 

    With the metric system being the most used system in the world, knitting patterns now state metric size knitting needles on their materials list. All international manufacturers of knitting needles and crochet hooks use the metric system on their products, 

    Fun fact: Only three countries in the world have yet to adopt the metric system: 

    1. United States 
    2. Liberia. 
    3. Myanmar. 

    As for everyone else, there is wide recognition of millimetres when looking at needle sizes. You will still see “4mm/ US 6” or “4mm/UK 8” on some patterns, but broadly speaking, metric is the most used today among knitters. 

    Here is an ad free knitting needle conversion chart. 

    UKUS Metric (mm)
    1402.0
    1312.25
    1222.75
    11 3.0
    1033.25
     43.5
    953.75
    864.0
    774.5
    685.0
    595.5
    4106.00
    310 1/26.5
    2 7.0
    1 7.5
    0118.0
    00139.0
    0001510.0

    Nowadays, knitting needles come in so many shapes and sizes that this chart will be just the beginning of your needle conversion. Any vintage pattern I have ever used gives instructions for a flat knit piece, but did you know that you can knit straight on circular needles too?

    This post is free to read, but you can also save it for later on Pinterest! Save the image below for a future bailout.

    cards
    Powered by paypal
  • US and UK Crochet Terms For Beginners.

    In this post, I’ve explained what the key differences are for crochet beginners. Below you’ll find a really simple chart showing you the crochet terms for beginners. This will help you understand every English pattern you come across, as some are written using US terms, and some are written using UK terms!

    US and UK crochet terms for beginners. Crochet explained.

    US and UK crochet terms for beginners explained: What is the difference between them and why should you know?

    Every crochet beginner at some point will come across US and UK crochet terms. Some will learn the difference straight away and others will ignore and steer clear of the ‘alternative’ until they see something they really want to make. However, I want to show you how easy it is to learn the differences and I will explain why I want you to learn them.

    Firstly, imagine that you didn’t know about any of this and have just made your first crochet sweater. You are so excited to throw it on but you realise when trying it on that something isn’t right. The piece feels way too big. What could be causing the mishap? 

    Was the crochet book or pattern using US or crochet terms? Oh dear.

    I’ve done it myself. I’ve made things that are far too small and tight because they were written in US terms and I had just finished watching a tutorial in UK terms. Whoops. We all live and learn. Did you know that as well as your hook size and  yarn choice, it is also crochet terminology that can severely impact the finished result of your item? (gauge and tension are the same, by the way) I’ll explain why here: 

    US and UK crochet terminology chart 

     UK termUS term
    Double crochet (Dc)Single crochet (Sc)
    Half treble crochet (Htr)Half double crochet (Hdc)
    Treble crochet (Tr)Double crochet (Dc)
    Double treble crochet (Dtr)Treble crochet (Tr)
    Triple treble crochet (Trtr)Double treble crochet (Dtr)

    Why is there a difference between these terms? 

    I have a theory that UK crochet terms are based on how many loops you have on the hook after inserting it into the chain for the first time. For example, when you insert the hook into the stitch to make a US single crochet, you have two loops on the hook. When you insert the hook to make a US double crochet, you have three loops on the hook. This would explain why it is called a treble in UK terms, with treble meaning three times. 

    This would then mean that the US terms are based on the movements of the hook, for example: 

    Single crochet: 

    Insert hook, yarn over and pull through both loops on the hook. It was an unbroken motion, whereas US double crochet would go like this: 

    Yarn over, insert hook, yarn over and pull through 2 loops (just like single), yarn over pull through another 2 loops. We essentially doubled the motion of single crochet, and that might be why it is called double crochet. 

    It’s only a theory anyway, but I hope that you find the chart useful. 

    Knowing the difference between US crochet terms and UK crochet terms won’t always be this hard. 

    Just remember that if you see ‘single crochet’ on a pattern or video tutorial, then the pattern is definitely using US terms, as single crochet does not exist in UK terms. 

    In the grand scheme of things, there are only 5 stitches to learn, Chain stitch is the same and slip stitch is the same. I would advise any crochet enthusiast to learn both sets of terms. There are several reasons for this: 

    • Crochet patterns are global now.
    • Only learning one set of terms restricts your access to all crochet patterns and we wouldn’t want that. 
    • It would help you to read vintage crochet patterns easily. 

    Fortunately, most crochet designers will state clearly in the description or the pattern if the pattern is written in US or UK crochet terms. I use both when working with other people’s patterns but I publish my patterns using US terms. On pattern platforms such as Ravelry and Lovecrafts, you can filter patterns based on whether they use US or UK crochet terms. 

    Although this is a good feature, I would always recommend that you learn and use both sets of terms, as a crochet terminology chart is only a click away. Nothing makes me sad quite like a crocheter tell me that they couldn’t make the item  because they “couldn’t be bothered” learning the other terms. There is a whole world of crochet out there and I want you to see it for yourself. Do not let it limit your crochet dreams. 

    I hope you found my post about crochet terms for beginners helpful! be sure to share it with others.

    If you’d like to learn more crochet, check out these other blog posts for beginners:

    How to crochet a granny square.

    What is a chain space?

    cards
    Powered by paypal
  • Crochet hook sizes. Conversion chart for crochet hooks.

    In the world of crochet, the names we use are different depending on where you are on the world. Here is a beginner’s crochet hook conversion chart. 

    If you are learning to crochet or vaguely familiar with it, it may have caused you some confusion when looking at hook sizes. For example, if you are in the UK and the pattern you are using is from the US, it might ask you for a hook size that resembles a letter of the alphabet rather than a number. The best way to get your head around this is by using a crochet hook conversion chart. 

    Size really matters when you’re learning to crochet. 

    Hooks are sized in accordance with the thickness of the shaft. This is important as we need to know which hook suits the yarn that we are using. As you will see in the chart below, the hook sizing is complicated but hopefully this will make things a little bit easier for you.

    Measurements  of crochet hooks.

    Whilst most of us refer to metric units of measurements, there will still be a vintage pattern or a US pattern that could cause confusion. 

     Metric (millimetre)US letter US number UK old 
    2mm 014
    2.25mmB113
    2.50mm 1 1/2 
    2.75mmC212
    3mm 311
    3.25mmD310
    3.5mmE4 
    3.75mmF59
    4mmG68
    4.5mm 77
    5mmH86
    5.5mmI95
    6mmJ104
    6.5mmK10 1/23
    7mm  2
    7.5mm  1
    8mmL110
    9mmN13 
    10mmP15 
    12mm   
  • How to get your granny squares right every time. Granny square help!

    How to get your granny squares right every time. Granny square help!

    When I’ve been teaching my crochet students, often we will come across beginner problems. These are nothing to worry about and everybody makes mistakes when they’re starting out with crochet. If you’ve been making a granny square and it seems to be changing shape, curling, flopping or frilling, hopefully I can help with that!

    With these simple methods, you can be sure that there is an easy fix for your granny square dilemma.

    How to get your granny squares right every time. Here are some tips and tricks from Hanna, a crochet teacher and designer. 

    If you are new to crochet (or not so new) and have issues when it comes to making granny squares, there could be a few reasons why it’s not going well. Here I will talk about the most common reasons and I will offer solutions on how to address them. 

    Tension

    Those who are new to crochet fall into the camps of too tight or too loose, mostly. This is normal and is a symptom of crochet being a brand new skill for you to learn. We cannot crochet like a pro after one youtube video. We all go wrong somewhere. For newcomers, it is usually tension. Here are three things that I advise: 

    1. Choose a bigger or smaller hook than what has been prescribed. If your squares are tight, curling up or looking round, it could be that your hook size is too small. If your square is really floppy and ruffling, it could be that the hook is too large. I always advise increasing by 0.5mm each time. For example, if I was to use DK yarn and a 4mm hook, the tension may be too tight, so I would have to use a 4.5mm hook to see a more relaxed tension. This is inevitable for some people. Some of us will always crochet tightly and some will always crochet loosely. This is why you need to look at your own stitches and see if they are smaller or larger than the pattern suggests. Adjust accordingly. 
    2. Make more chains than what is suggested. This is a simple trick and allows your corners to sit properly. If the pattern calls for one chain between your corner clusters, make 2. See how that works. If the pattern calls for 3 chains between clusters at the sides, perhaps chain 4 to help it relax. You will know what works when you see your square. Is it lying flat? Bingo. 
    3. What yarn you use can affect tension. Not all DK weight yarn is the same. Some are slimmer, some are bulkier. The category is quite broad. Take this into account when you are making your granny square. Also take into account the fibre. A standard acrylic such as Hayfield bonus may have less stretch and ability to relax after the square is made. Wool and cotton can be more forgiving after a soak and a block. If you have a tight square and it is acrylic, I would advise ripping back and starting again. 

     Click here to see the full granny square tutorial.

  • Improve your crochet in five easy steps.How to get better at crochet TODAY.

    Do you want to improve your crochet skills but don’t know what to do next? Here are a few quick and simple tips to make learning to crochet even easier. These little tips will be easy to implement in a day. 

    These crochet tips might help you improve your crochet at a moment’s notice, or they might take a while longer to implement. Go easy on yourself!

    Death by Granny square- stop doing this. 

    People do ‘death by granny square’ and I never understand why. They keep picking up that granny square and even though they’re not getting it, they keep sticking that hook in and get upset when it becomes a circle or a triangle instead. My advice? Put it down and walk away. If there’s something about the granny square that you’re not getting, please put it down and do something else for an hour, a couple of hours or a full day. 

    There is no eye opening experience greater than coming back to your granny hodge-podge and seeing exactly where you went wrong. There may be too many corners. There may not be enough corners. You won’t see the forest for the trees if you keep staring at it in despair. 

    Here’s a quick video showing you how to make a basic granny square. I’ve slowed down as much as I can but you can also adjust the speed settings on the video to watch it in slow motion if you need more time. 

    https://youtube.com/watch?v=u0FFaFjJj7M%3Fsi%3DXxQyaH9N471wi4kQ

    I also have this handy little print out available so you can study the granny square in even more detail. 

    Stop your crochet stitches blending into lingo soup. 

    Stop your crochet stitches from blending into lingo soup from today. There’s a really easy method for this one: Learn your terms. No, seriously, it will save you so much hassle. Here’s a handy chart showing you what’s what. There are only 4 main stitches to know, here. Is it really that hard or are you actively resisting? 

    US and Uk crochet terms.

    If you’re still struggling, here’s my crochet stitch guide for beginners. It’s a simple and quick companion of the basic stitches in coloured photographs as well as their UK names, US names and instructions. It’s extremely handy to use if you’re using Youtube to learn or if you’re trying to read patterns. 

    Stop comparing yourself to others. Switch the social media off. 

    It’s so easy to scroll through social media and be inspired by all of the amazing crochet out there. It’s also incredibly easy to give yourself a heavy dose of comparison-itis. You can’t help it. Instagram and Tiktok are set up for this kind of thing. After seeing hundreds of beautiful crochet pieces, you could easily come away feeling like you’ll never be that good. Where you’re at today is probably where those people were 5 years ago. There really is no basis for comparison here. 

    In the time you just spent scrolling social media (you’d be amazed at how much time flies when you’re doom scrolling) you could have worked on your crochet!

    Ok, your crochet may not be that pretty– yet. Stop using instagram for a couple of days and focus on what you’re doing. Turn your phone off for half an hour (or disable apps if you need it on for emergencies) and focus solely on the crochet. These are short bursts of time that we could really stick with if we removed all other distractions. Even as little as a dedicated half hour once a week would make a huge difference to your crochet skills. 

    Don’t crochet when you’re drunk or tired. 

    Both of these instances produce similar results (ask me how I know). The more tired you are, the more mistakes you will make. If you’re ok with that, hook on! If you’re not, put it to one side and try again tomorrow. 

    This didn’t really need mentioning, did it? 

    Crochet something small. 

    Making small things for a while is absolutely fine. Your first crochet project doesn’t have to be a blanket or a garment. Make a toy, a baby item or a small accessory. You”d be amazed at the way you get that hit of accomplishment in a relatively small amount of time. 

    Easy crochet baby sweater pdf. Crochet something easy when you're a beginner. baby cardigans for crochet

    What have you tried to help you improve your crochet? Did it work? Let me know in the comments! 

    These are just five simple ways to improve your crochet. If you have any other ideas that could help people improve their crochet, be sure to drop them into the comments.

    See also:

    Crochet terms chart for beginners.

    Crochet stitch guide for beginners.

  • Beginner guide to yarn substitution.

    Yarn substitution is something that can seem complicated, but once you know what to look out for, you can use up your stash! Yarn substitution is a really handy skill that every yarn wielder needs to know, as not all yarn will be available forever.

    Ever downloaded a pattern and find that the yarn used in the sample photos isn’t even available in your country? Or that it is but it is way out of your budget? Would you prefer to use up your stash and stick with something you have?

    This is all easy to sort out with some simple yarn substitution. 

    Substituting based on the label: 

    Meterage/yardage. 

    Don’t just go with the same weight- how many balls of your sub yarn do you need? 

    Say for example the yarn in the pattern asks for a brand of DK yarn that is 100m per 100g ball and the yarn that you’re using is 200m per ball, you’ll need 50% fewer balls of yarn. Some patterns will tell you the exact meterage/yardage and this makes it really easy to substitute. 

    How thick is it? 

    Don’t be fooled by the label saying “DK”. For a long time, Cygnet Boho Spirit was labellled as a DK even though it works up as a worsted. Their Truly wool rich DK is also on the thick side, so it’s worth finding out for yourself before you jump into a pattern. 

    If you’re trying to use up stash yarn and some balls are missing labels, you can also measure wpi (wraps per inch). 

    Yarn weights and wraps per inch. Yarn thickness chart.Yarn sub

    How do I measure wraps per inch? 

    Take a pencil or a standard pen and wrap your yarn around it several times. You need to wrap until you’ve done at least 2.5cm (1 inch). Take a measuring tape or a ruler and measure how many wraps you can fit in an inch. 

    I can fit 23 wraps to an inch on this pen. I can now look at the yarn chart above and see that my yarn belongs in the #1 category for “light fingering, 4ply”. This is a great way to see how thick your yarn is if you’ve lost the label. I would therefore be able to use this yarn in a pattern that calls for light fingering or 4ply. 

    How to measure your yarn without a label. Wraps per inch tutorial. How do I know how thick my yarn is. Yarn substitution.

    Swatching 

    Whilst I do not expect anybody to go out and buy a ball of every potential yarn to swatch with, I do suggest that you do this if the yarn is all to hand i.e in your stash already. Not only will you get to see how it works up but you will also be able to see if you like it and if you think it will work with the project. 

    Always use the gauge/tension as your guide and you will not go wrong. People sometimes ask me “what yarn do you recommend?” for my patterns if they are in a country where the yarn is not available or if the recommended yarn is out of budget. My answer is always: 

    Whatever yarn gives the correct meterage. 

    Whatever yarn meets the gauge required. 

    If you are looking to buy new yarn for a project and don’t know what would be a good substitute, you can always use yarnsub.com for extra help choosing.

    cards
    Powered by paypal
  • Easy 2 needle flat knit socks pattern

    Easy 2 needle flat knit socks pattern

    Do you love the idea of cosy, hand-knit socks but dread the complicated process of using four or five double-pointed needles? Knitting socks can be intimidating for even the most experienced knitter. If you’re looking for something that will build your confidence, look no further!

    In this article, we will explore the method of knitting socks flat on just two straight needles. Yes, you read that right – no circular needles or DPNs required! Whether you are a beginner knitter or an experienced one looking for a new challenge, this method will revolutionise your sock-making game. Say goodbye to pesky stitches falling off the needles and hello to a simpler, more manageable knitting experience. Get ready to dive into the world of flat-knit socks and discover the endless possibilities.

    This simple two needle flat knit socks pattern is a straightforward, simple way to learn the basic construction of a sock. Many knitters are hesitant to try socks on double pointed or circular needles, so I designed this pattern as a confidence builder. This pattern also covers the square heel, which is my favourite type of sock heel: The Square heel. Here’s a video showing you how to knit this heel:

    This is a free pattern for two needle socks knit flat. You can either use the blog pattern for free, or if you’d like, here’s the easy PDF for your own convenience.

    Whether you are looking to try a different construction for socks or you simply prefer knitting flat, these socks are for you. No side, toe or heel seams are required; just one simple seam up the front of the sock. The heel is worked using short rows and the toe consists of a drawstring finish. 

    Materials required to make these flat knit socks: 

    60g (70g, 90g) of 4ply sock yarn. 

    Yarn used in socks pictured is Gamer Crafting Sock 4-ply [75% Merino, 25% Nylon, 400m per 100g] in ‘Pride Was A Riot’. 

    2mm and 2.5mm needles (or size needed to obtain gauge) for working flat.

    4 stitch markers. 

    Darning needle. 

    Gauge: 

    32 sts and 38 rows to 10cm/4 inches in stocking stitch on larger needles.

    Finished Foot/Leg Circumference: 

    Size 1: 17.5cm/7 inches

    Size 2: 20cm/8 inches

    Size 3: 22.5cm/9 inches

    Sample shown in size 2.
    Length of leg from cuff to heel is 24cm/9.5 inches.

    Foot length from back of heel to toe is 24cm/9.5 inches.

    Glossary:  

    K: Knit

    K2tog: Knit two stitches together. (1 stitch decreased)

    M1L: Pick up the bar between the stitch you have just knitted and the next stitch, bringing the needle from the front to the back. Knit into the back. (1 stitch increased)

    M1R: Pick up the bar between the stitch you have just knitted and the next stitch, bringing the needle from the back to the front. Knit into the front. (1 stitch increased)

    P: Purl

    P2tog: Purl two stitches together. (1 stitch decreased)

    PM: Place marker

    PSSO: Pass slipped stitch over

    RS: Right side of work

    SKP: Slip one stitch knitwise, knit one stitch, pass slipped stitch over knitted stitch. (1 stitch decreased)

    SM: Slip marker

    SSK: Slip two stitches separately knitwise to right-hand needle, knit them together through the front of the stitches. (1 stitch decreased) 

    St(s): Stitch(es)

    WS: Wrong side of work

    Cast on your flat knit socks.

    Leg 

    With smaller needles, cast on 56 (64, 72) sts. 

    Rib row: [K1, P1] to end of row.

    Repeat Rib row to work 1×1 rib until cuff measures 5cm/2 in, ending after a WS row. 

    Switch to larger needles. 

    Work stocking stitch (knit on RS, purl on WS) until leg measures 18.5cm/7.25 in from cast-on edge, ending after a WS row.

    Next, it’s time to shape the heel. Pay close attention to this part because if you don’t have the right amount of stitches, your heel won’t sit right.

    RS: K14 (16, 18), PM (marker 1), M1R, PM (marker 2), K28 (32, 36), PM (marker 3), M1L, PM (marker 4), K to end. 

    WS: P all sts. 

    RS: K to marker 1, SM, K to marker 2, M1R, SM, K to marker 3, SM, M1L, K to marker 4, SM, Knit to end. 

    WS: P all sts. 

    Repeat last 2 rows another 8 (9, 10) times, until you have increased 10 (11, 12) sts on either side of the heel markers, ending after a WS row. 76 (86, 96) sts in total. 

    Now, turn the heel with short rows. See the video above if you’re still unsure about this part.

    RS: K to marker 1, SM, K to marker 2, SM, K17 (20, 23), SKP. Turn work.

    WS: P7 (9, 11), P2tog. Turn.

    RS: K to 1 stitch before the gap which has formed, SKP. Turn. 

    WS: P to 1 stitch before gap, P2tog. Turn. 

    Repeat last 2 rows another 8 (9, 10) times, until there are 28 (32, 36) heel sts between markers 1 and 4, ending after a WS row. This is the number of heel stitches you started with; your work will be RS facing with marker 2 on your right-hand needle.

    Knitting the foot of your flat knit sock.

    Remove marker 2. Insert needle as though making a M1R but instead of knitting, slip the twisted stitch on to right-hand needle. K1 and PSSO. K to marker 3, remove marker, insert needle as though making a M1L but slip the twisted stitch onto left-hand needle and K2tog. K to marker 4, SM, K to end. 

    You can remove markers 1 and 4 while you work the foot; you will need them again when you reach the toe.

    Work rest of foot in stocking stitch until it measures 5 (6, 6.5)cm/2 (2.25, 2.5) in less than desired length. 

    It’s time to shape the toe of your sock.  

    RS: K12 (14, 18), SSK, PM, K2tog, K22 (28, 28), SSK, PM, K2tog, K to end. (4 sts decreased) 

    WS: P all sts.

    RS: K to 2 sts before marker, SSK, SM, K2tog, K to 2 sts before marker, SSK, SM, K2tog, K to end.
    (4 sts decreased)

    WS: P all sts. 

    Repeat last 2 rows another 8 (10, 11) times, until there are 16 (16, 20) sts in total. 

    Finishing your sock

    Cut a long tail of yarn and, with a darning needle, thread tail through remaining sts and pull tight to close. Then, using mattress stitch, seam up the front of the sock. Weave in yarn ends.

    I hope you enjoy your new, flat knit socks. Let me know how you get on in the comments.

    Flat knit sock pattern. Easy socks on two needles free pattern. Knitting socks for beginners.

    Feeling confident?

    You can stay here if you’re feeling happy with your flat knit socks. However, there is the option to progress to knitting in the round! I have a pattern for an adult size sock or a smaller, novelty sock that can also be used for babies. If you’d like to try, you can have a go at knitting socks in the round.

    In conclusion, knitting socks flat on two needles may seem intimidating at first, but with the right techniques and practice, anyone can master this traditional method. We have explored the benefits of knitting socks flat, including the ability to customize and adjust sizing, as well as the convenience of not needing double-pointed needles. By following the step-by-step instructions and tips shared in this article, you can create a comfortable and stylish pair of socks that will keep your feet warm and cozy. As writer Elizabeth Zimmermann once said, “Knit on with confidence and hope, through all crises.” So go ahead and give it a try, and see the magic of knitting unfold right before your eyes. Keep learning and experimenting, and embrace the joy of creating something unique and handmade. Happy knitting!