Blog

  • Crochet Myths

    Crochet Myths

    Here I will debunk several crochet myths and misunderstandings that I have encountered on social media. 

    1. Crochet is just like knitting but with one needle. 

    Lies. It is a completely different craft. Firstly, crochet requires a hook, not a needle. The hook is used to pull loops through chains. Do not let anyone mansplain crochet to you. It’s a hook!

    2. You can’t crochet if you’re left handed. 

    False. You can crochet if you’re left handed. Crochet is worked right to left if you are right handed and left to right if you are left handed. I’ve taught left handed crocheters as well as a right handed. If you’re working in the round, there’s no wrong side most of the time so work anti clockwise and enjoy yourself. 

    3. Crochet is hard to make garments with because it creates really dense stitches. 

    Not true. Take a look at my blog post How to create crochet fabric that drapes and you’ll see that it is not dense. If you use chunky yarn and a small hook, it will be dense. You’d get the same thickness problem with small needles and a thicker yarn, so use common sense.

    4. Crochet is an old lady hobby.

    While I do not doubt that older ladies may like to crochet, this isn’t exclusive to that demographic. Crochet is enjoyed by people of all ages. The more you believe that kind of mythical trope, the more likely your work colleague who was thinking of taking it up to help with their stress and anxiety is not going to bother. Crochet is for everyone.  Now, please excuse me while I scroll through my Instagram feed and like all of the amazing crochet bikinis and dresses that the gen z makers are wearing in their photos. 

    I was really saddened to learn that my aunts didn’t ever share their crochet knowledge with me because they worried “it’s an old lady thing”. I was sad because they felt they had to hide it. There are still people out there who you might come across at work, at the park or in coffee shops who wink as though you’re in some kind of secret club that isn’t allowed to take centre stage. In the bin with that!

    5. Crochet can be machine made 

    Not true. Crochet can only be done by hand. Machinery would help justify the criminally low wages that the crocheters who make your high street clothing are paid but it doesn’t exist. Those people sit there all day and make a top that might end up in landfill a few months later. Knitwear can be made using a machine but crochet cannot. 

    People will try and tell you that crochet machines exist but you’re going to go on Google and search for a ‘crochet machine’ and find several results for rocking horse poo first. I’ll wait… 

    6. Crochet is tacky. 

    This is based on opinion. While some crochet is tacky I’m not going to piss on somebody else’s chips. What might not appeal to me will appeal to someone else. Nicole Scherzinger was doing a little dance on Tiktok wearing a bikini and cute granny square skirt. I thought it was quite nice but there were plenty of comments saying “My Nan has this on her couch”. I can only think that those ladies were jealous of either Nicole or the crochet… or both. 

    We have to keep it real here. Not all crochet is appealing to everybody. It is purely subjective. Don’t force people to agree with you based on your crochet ideals. Just be happy for the tacky and be thankful that it’s not in your living room, ok? 

    7. Crochet is harder than knitting. 

    This is another common misconception about crochet. It is not harder it’s different.  Knitters will approach crochet and forget that it takes weeks, months or years to get good at it. If you were a level 7 in Piano, would you start learning guitar and expect to enter at a grade 6? Hopefully not. It’s the same principle in crochet. Although they both work with identical yarns, knitting and crochet are cousins, not twins. 

    I always think to myself ‘if young Irish girls could learn it using only a basic steel 1.5mm hook and thread, how hard can it be?’ I don’t know how they could do that as I can barely see a 2mm but they did, somehow. There’s a knack and you have to find it. Some of you may have the knack for Irish crochet and others, like me, will not. That’s ok. Try another form of crochet instead. If you’re of Irish descent, like me, you may have wanted to honour your fore mothers (or great grandmother in my case) and try and keep the tradition going but sometimes it’s not possible. 

    Crochet can be hard but that’s not always the crochet’s fault. Try changing up your hooks, expectations, yarns, patterns and skill set. Maybe you need to stick with pot holders for a while longer. That’s ok. These things take time. 

    You have to be patient with yourself. You’re learning a new skill. You went to school for years to learn to read and write to a good standard, didn’t you? Why should crochet be any different? 

    Can you think of any other crochet myths? What have you come across?

    Further reading:

    A Brief History Of Crochet

    Crochet Stitch Guide For Beginners

    Crochet Hook Conversion Chart

  • A brief history of crochet

    A brief history of crochet

    Do you ever wonder where crochet comes from? Here’s a brief history of crochet. 

    Crochet is everywhere right now if you open social media but do you ever wonder where crochet comes from?

    If you’re a participant in this magnificent craft or know someone who is, you may have once wondered where crochet comes from. Here’s a brief history of crochet.

    If you know nothing about crochet, let me clarify a few things:

    • It wasn’t invented by Sh**n, that’s for sure.
    • You may be able to buy a crochet tank for £15 from the high street but if you knew what work goes into it, you might think twice. 
    • Crochet is an art form. One person has done that with one hook. It could have taken them hours, weeks or months to make. 
    • Crochet cannot be made by machine. It is just not possible to crochet using machinery. There are knitting machines but not crochet machines. It can only be done by hand. How many other things can you think of that can’t be made by a machine? 

    Where does crochet come from? 

    Crochet is thought to come from Asia originally.

    Crochet is thought to have originated in the Middle East, China and South America a very long time ago. It is theorised that it was pre-1700s but the exact dates are unknown (possibly because it was the work of lower class women? Not worth documenting, right? Thanks Patriarchy). It bears a close relation to the ancient art of Chinese embroidery. I’ll show you how this links up to what crochet looked like when it reached Europe. 

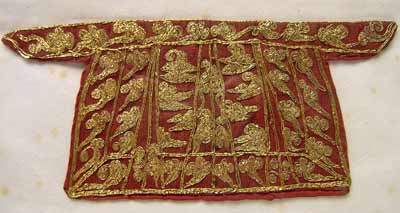
    Ancient Chinese embroidery is linked to modern crochet

    This piece is taken from the Tang Dynasty (618-906). It’s an embroidered shirt that once belonged to someone of the upper classes. Embroidered garments were worn according to wealth and the stitches used were a combination of chain stitches and straight stitches. It’s the chain stitches that are of interest here, as they resemble modern crochet chains. 

    Like with one needle, we work with one hook for crochet. We don’t thread anything through the hook but we do make chains and build on what has previously been laid out. Think of the granny square: we start in the centre after making chains and we build on every stitch to create more stitches. They have to connect with chains. 

    Crochet in European history.

    When crochet came to Europe in the 1700s, the main reason was lace. Lace was a luxury item. It was expensive, sought after and worn by the elites of European nations. Think cuffs, veils, collars, neckerchiefs and gowns made of delicate silks and fine cotton. 

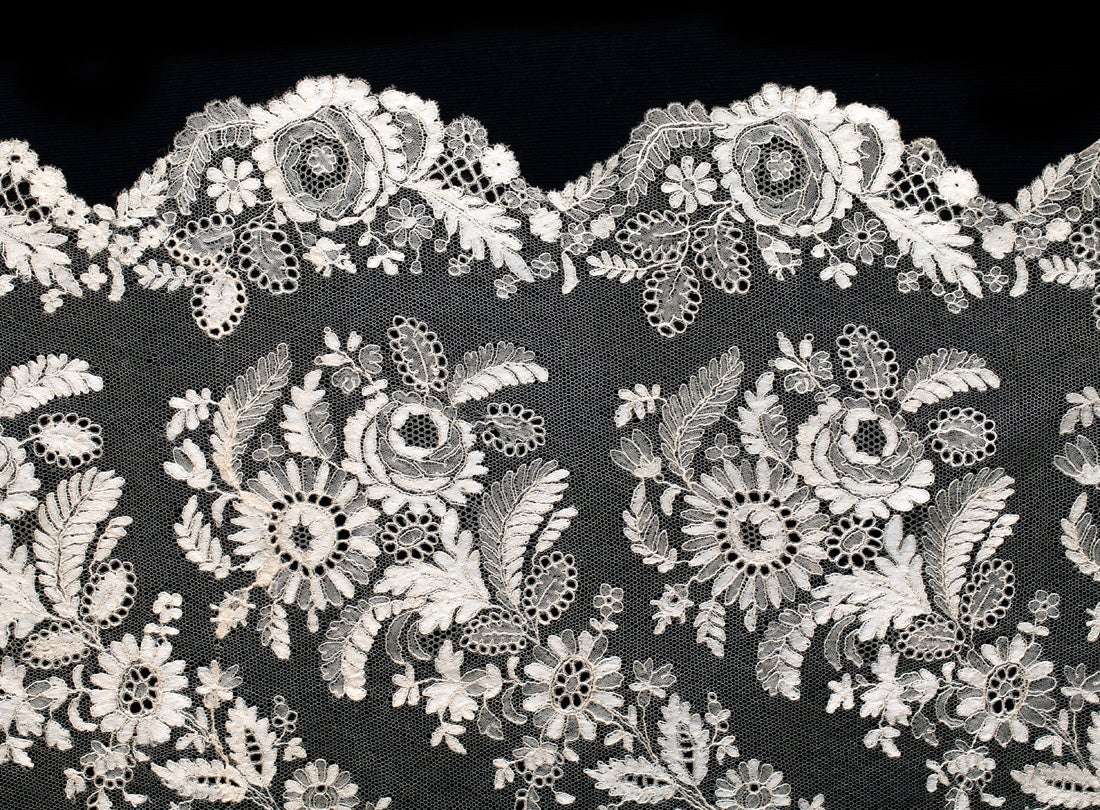
    19th century lace shawl

    Image shows a mid-1800s shawl made with Blonde bobbin lace, France (Collection of Lacis Museum of Lace and Textiles, Berkeley, CA) 

    There were two types of lace used in Europe: Needle lace and bobbin lace. Both were a way of creating see through embroidery-like fabric. 

    Lace, a decorative openwork web, was first developed in Europe during the sixteenth century. Two distinct types of lace making—needle lace and bobbin lace—began simultaneously. Needle lace is made with a single needle and thread, while bobbin lace entails the plaiting of many threads. Lace thread was typically made from linen, and later silk or metallic gold threads, followed by cotton in the nineteenth century. 

    Lace: A Sumptuous History 1600s–1900s

    Lace was so popular that in some European courts, the wearing and importing of lace from particular countries was banned. It was heavily sought after and inevitably smuggled. As lace making was painstakingly time consuming and expensive, tatting and crochet were born in the 1800s.

    This was a way of making lace-like items in a quicker, more cost effective way. Working class girls could take it up as a way of earning a living. It was a domestic skill rather than industrial and it would benefit women most. Throughout 18th century Europe, women were crocheting behind closed doors as a way of boosting their household income. It was one of the only jobs a woman could do in a time before equal rights and flexible working. As it was difficult to get a job if you had to care for several small children, a household and a husband, lace was worth investigating. 

    Crochet in the 1800s

    Crochet could not have come to Europe at a better time. It was during Ireland’s potato famine that it particularly brought benefits to Irish girls and women. They could earn money by making beautiful motifs, shawls, tablecloths and much more. 

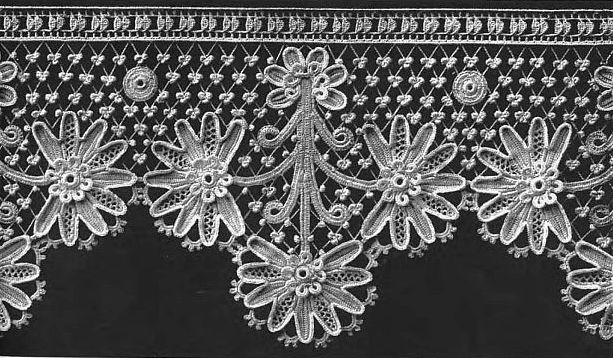
    Irish crochet

    Irish crochet basically mimics lace. It is constructed from a main motif that is repeated several times (in this case, a flower) and is joined by mesh stitches. This is all done with a small, steel crochet hook and crochet thread. Isn’t it amazing? There’s no crochet quite like it. If you laid this on to some plain fabric, it would resemble embroidery. 

    In the book Masterpieces of Irish Crochet Lace Mary Carolyn Waldrep writes: 

    The delicate three dimensional flowers, leaves and sprays that characterise Irish crochet are considered by many to be the finest example of that crocheter’s art. This beautiful craft was originally developed mid-19th century Ireland as a method of imitating expensive Venetian point laces. Within a few years it was being taught in almost every convent in the country and by the 1880’s there were at least 12,000 women in Cork and its surrounding area alone engaged in making crochet lace.

    Irish crochet lace enjoyed fame into the late 19th century until competition from machine made lace pushed it to one side. It did not die off though! It is still being enjoyed to this day. 

    Modern crochet

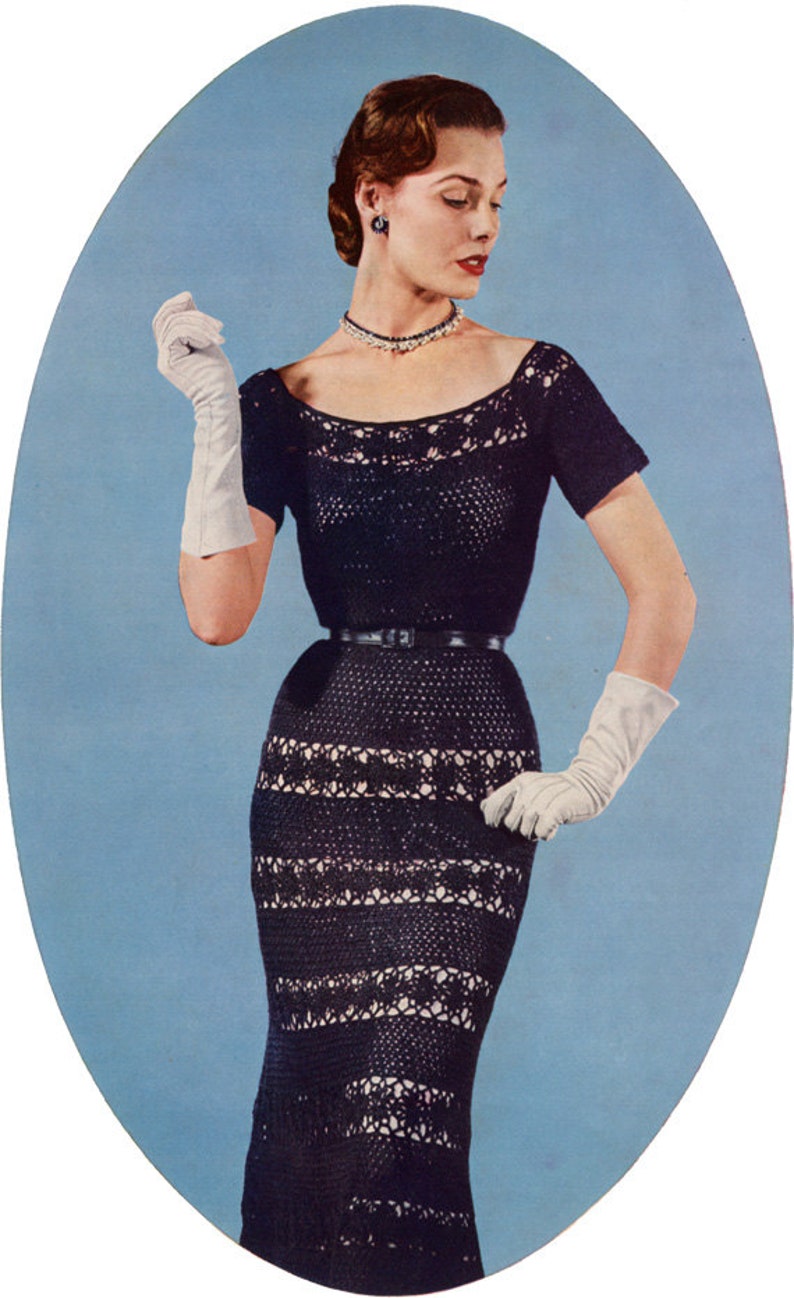
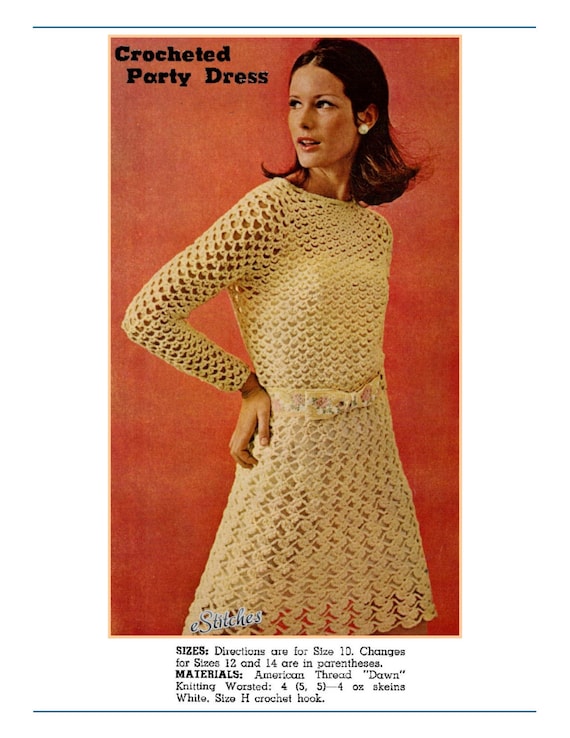
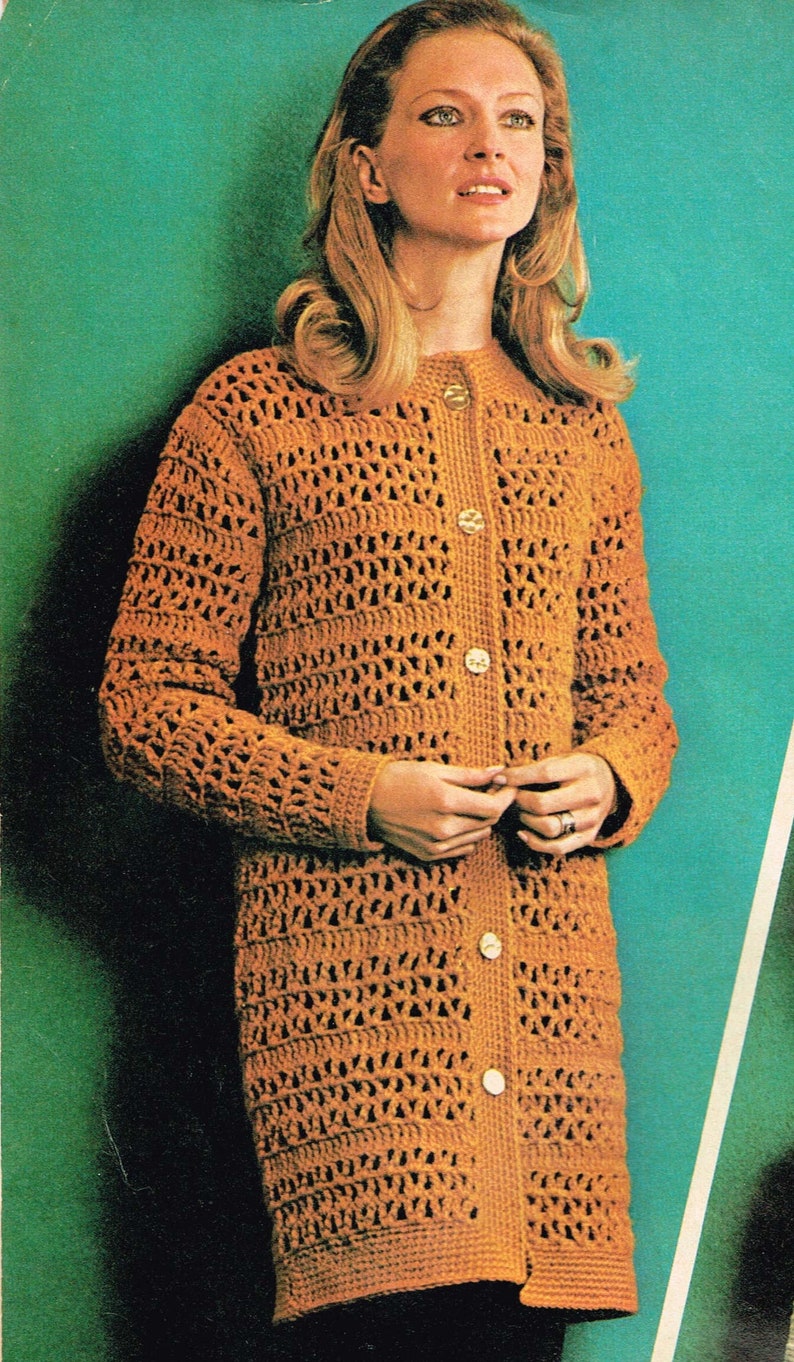
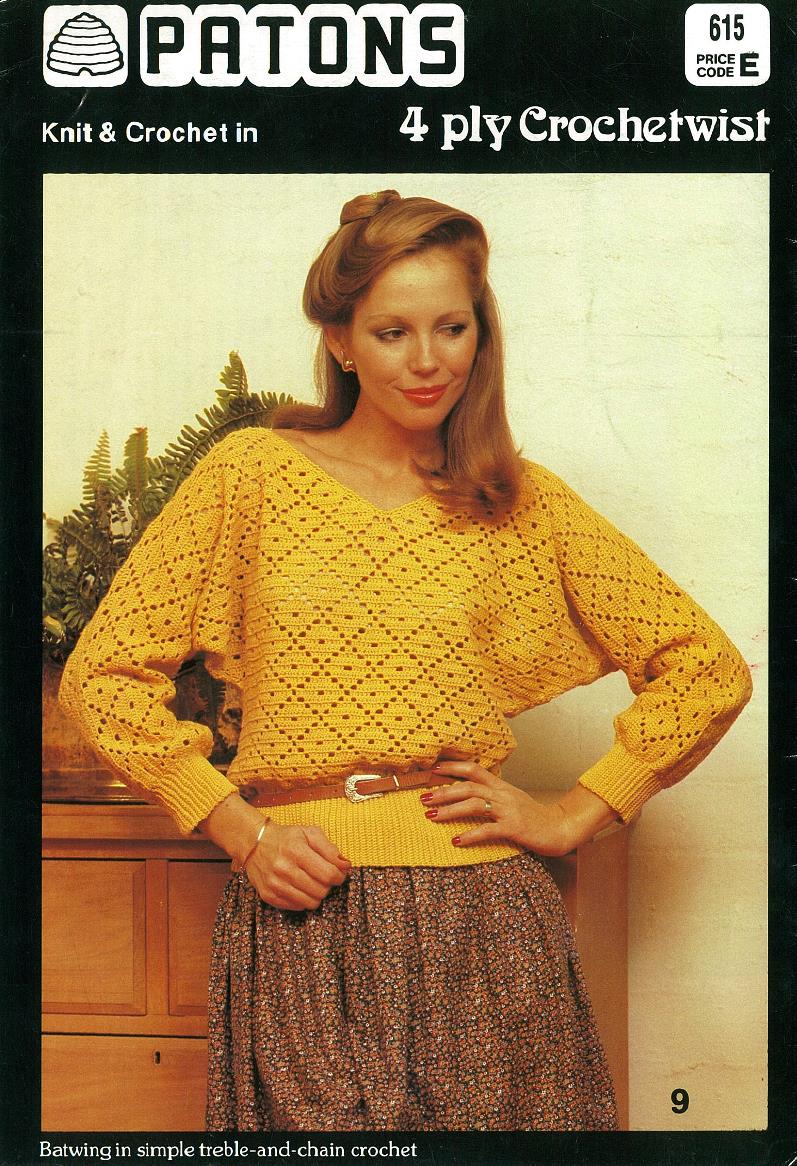
    As lace was taking a back seat into the 20th century, crochet developed more and more. Patterns that had been shared in women’s periodicals were still being shared well into the 20s and 30s and crochet enjoyed significant prominence in the 60s and 70s. The threads got thicker and as it was a fast activity, trends could be kept up with. Here’s a timeline of iconic crochet garments from the 1930’s to the 1980’s. 

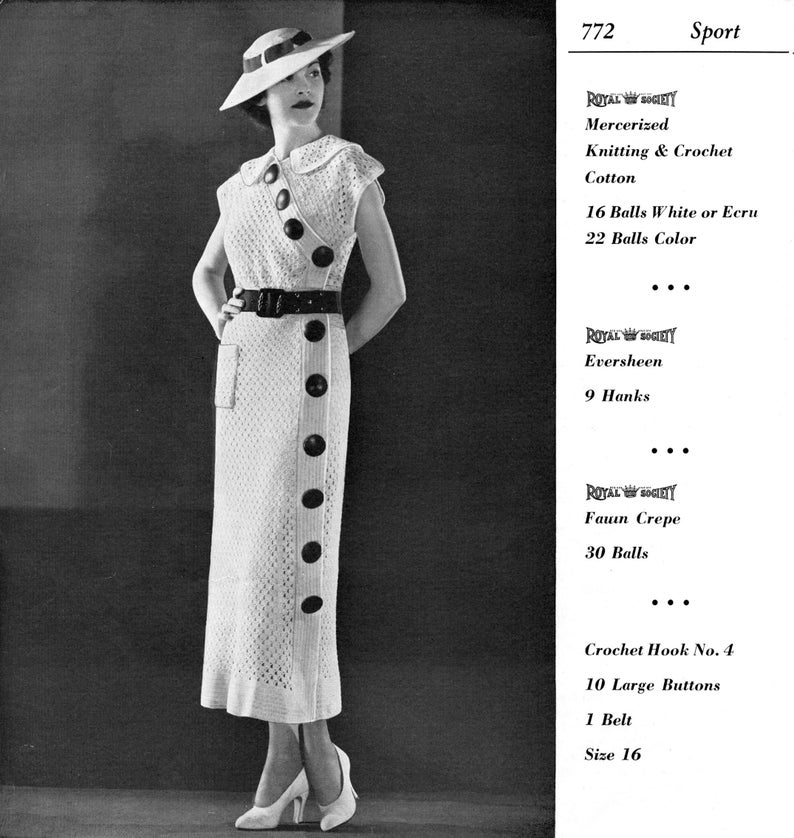
    1930’s 

    Vintage crochet dress pattern from 1930

    1940’s 

    1940s classic crochet jacket design

    1950’s

    1950s crochet evening dress. A history of crochet

    1960’s 

    Crochet designs from the 20th century

    1970’s 

    Openwork cardigan pattern

     1980’s 

    1980s jumper pattern

    Think about it: some of the most stylish garments that you could get your hands on could be made by you.

    Crochet in 20th century history.

    In the 20th century, fabrics and yarns were significantly cheaper than buying ready made garments on the high street. Even with the boom of cheaper synthetic clothing and textiles in the 1960’s, you could save money by making your own clothing. 

    Crochet in the modern world.

    We live in a different world today but with a bit of encouragement (and the existential crisis we face with pollution and planet destruction thanks to our titanic internet fast fashion brands), slow fashion and DIY wardrobes are making a comeback. Did you notice that there’s not a granny square or toilet roll cover in sight here? Yes, me too. 

    Contemporary crochet

    I won’t share 90’s to now because I think over the last 30 years we have been revisiting, redesigning and embracing the retro. In the 90s, some cardigans were still very much all about the bat wing or man-sized fit to billow or hang off the female form (think Princess Diana). In the late 90s and early 00s it was very much fitted and sometimes barely there (Britney had a knack for sweet girl-next door wearing hardly anything). I love that from the 2010’s to the 2020’s you can have any style of crochet that you like. We really celebrate the differences in taste, body shape, body size and colour preferences. It’s a good time to crochet!

    The 60s and 70s were very much documented as the “crochet boom” of the 20th century but I think we are in a boom right now. It’s not just about granny squares or imitating lace; crochet has evolved. 

    I hope you enjoyed this little tour of crochet. I certainly did.

    Hanna Gough is a knitwear and crochet designer. In the image she is wearing rhe Jewel hat crochet pattern.

    Hanna Gough is a crochet and knitwear designer from Liverpool, UK. She published knitting and crochet patterns on her blog as well as tutorials and blog articles on knitting, crochet, hobbies and crafts.

    If you’d like to stay up to date with the latest news, blog posts and offers,, subscribe to Hanna’s newsletter here.

    Now, where did I put my hook? 

    Further Reading: 

    How To Get Started With Crochet

    Crochet stitch guide for beginners

    Why you should try the granny square

    A Short History of Chinese Embroidery 

  • The Breeze Crochet Cardigan. Simple V stitch crochet cardigan in worsted weight yarn.

    The Breeze Crochet Cardigan. Simple V stitch crochet cardigan in worsted weight yarn.

    The Breeze crochet cardigan is a v stitch cardigan with a v neck. It’s a simple design made using several crochet panels that are either joined together with a crochet hook, or seamed. The choice is yours!

    This cardigan comes in 7 sizes, so you can make it for yourself or someone else.

    The Breeze crochet cardigan 

    Yarn used: Cygnet Boho Spirit in Sapphire

    The Breeze cardigan earns its name for two reasons: the air between the v stitches creates subtle openwork allowing your skin to breathe, while the process of v stitch ensures easy crochet. 

    Thanks to the v stitch, you can spend more time crocheting with air and less time working into the chain!

    This cardigan is available in seven sizes and offers a generous, oversized fit. It is therefore perfect for lazy weekends or keeping the chill off on a spring afternoon. 

    If you’d prefer the ad-free PDF with colour coded sizing, you can get that from Ravelry here.

    The cardigan is constructed in 3 separate, flat pieces (back, front left, front right) with some armhole shaping and neck shaping at the front. The side waist panel is then created using double crochet. The back piece is then seamed with the front pieces, seamed at the shoulder and the sleeves are worked in the round. The edging and cuffs are created using double crochet. 

    Yarn used for this V stitch cardigan.

    I used Cygnet boho spirit yarn for this cardigan which is 100% premium acrylic, sleek and soft with a subtle sheen. The self striping quality of the yarn means you can have all of the colours without weaving in any ends! You can read more about the yarn here.

    The cardigan is adjustable to suit your particular preferences; e.g tall or petite sizing, with some guidance under the measurement chart on the next page. 

    As the waist panels can be widened or narrowed if need be, this really can be tailored to fit your individual body!

    Size chart for the Breeze v stitch cardigan pattern.

    Please check your own measurements before starting this pattern.

    SizeChest size Finished measurement Back V sts 
    XS80cm/32in86cm/34in 18
    S90cm/36in 96cm/38in 20
    M102cm/40in105cm/42in 22
    L112cm/44in 115cm/46in24
    XL120cm/48in 125cm/50in26
    2XL130cm/52in135cm/54in28
    3XL140cm/56in145cm/58in 30
    SizeFront V stsSide waist panelHem to armhole
    XS102 rows38cm/15in
    S102 rows 40cm/15.5in
    M112 rows 40cm/15.5in
    L124 rows 42cm/16.5in
    XL134 rows 42cm/16.5in
    2XL146 rows 42cm/16.5in 
    3XL156 rows 42cm/16.5in
    Size Full back lengthTotal sleeve length 
    XS56cm/22in52cm/20in
    S58cm/23in52cm/20in
    M58cm/23 in54cm/21in
    L62cm/24.5in54cm/21in
    XL62cm/24.5in54cm/21in
    2XL64cm/25in56cm/22in
    3XL64cm/25in 56cm/22in

    Notes on fit: 

    • This cardigan is worn with 5cm/2in positive ease, so choose your body measurement from the Chest Size column above. 
    • As this is worked flat, there is a single dc stitch at the end of every row. This adds to the width of the garment, as does the side panel. If you have made your size but think the back or front panels are too narrow, add more rows to your side waist panel.
    • If you are petite or tall, make your size according to measurements, but add 2 rows/subtract 2 rows at the waist (before armhole) and at the sleeve. Try on the cardigan to decide when is a good place to stop and work the cuff.
    • You will notice that the hem to armhole for XL-3XL have shorter measurements. This is because they have longer, lower armholes. 

    Glossary

    ApproxApproximatelyMeasurements given in approximations. 
    ChChainThe chain is the loop where you insert your crochet hook. Chains also make the first stitch of the row. Make a slipknot, yarn over and pull through the loop. This creates a chain. 
    Ch spChain spaceThe space or gap that has been created by stitches in the previous row. 
    DcDouble crochetYarn over, insert hook, yarn over and pull through. Yarn over and pull through 2. Yarn over and pull through 2. 
    RSRight side(s)The side of the fabric that is to be shown worn on the person, on the outside of the finished garment. 
    SkSkipSkip a stitch 
    SlSlip stitchInsert hook, yarn over hook, pull through all loops. 
    SpSpaceThe space or gap created by the row before. The spaces under the chains. 
    StStitchThe stitch e.g. double crochet, v stitch. 
    V st V stitch Make a double crochet into the chain or chain space, chain 1 and make another double crochet into the same chain or chain space. The two dc stitches create a ‘V’ shape. 

    US terms used throughout 

    If you don’t know your Us crochet terms or need a refresh, you can use my handy glossary here.

    In parts where size is not mentioned, this means that the instructions are the same for all sizes; e.g. cuff and edging. 

    Sample shown in size L 

    Gauge: 

    5 v sts and 6 rows to 10cm/4in gauge square on 5mm (H) crochet hook. 

    Materials needed: 

    • 5mm (H) crochet hook
    • 5/5/5/5/6/6/6, 2.5cm/1in buttons 
    • Tapestry needle
    • 4/4/4/5/5/6/6 balls of Cygnet Boho Spirit (worsted, 240m/262 yd per 100g/3.5oz ball.) Sample used was Sapphire. 
    • 4 removable stitch markers. 

    Back

    Ch 60/66/72/78/84/90/96 (3 ch count as 1st dc) dc in 7th ch from hook, ch 1 and dc in same ch, sk 2 ch, dc in next ch, ch 1 and dc in same ch. Repeat to last 3 ch. Dc in last ch. Ch 3, turn. This will now be referred to as v st. (18/20/22/24/26/28/30) V sts. 

    Row 2 and every following row: (3 ch counts as 1 dc st), make a v st into centre of every v st ch sp. Dc in last dc st. Ch 3 and turn. 

    Work row 2 until piece measures approx 38/40/40/42/42/42/42cm (15/15.5/15.5/16.5/16.5/16.5/16.5in) or

    19/20/20/21/21/21/21 rows **

    Armholes: 

    Fasten off. Cut yarn. Place removable stitch marker into 1st v st of the row.  Sk 1/1/2/2/2/3/4 v sts and reattach yarn by making a ch 4 and working a dc into next v st (counts as 1 v st). V st into every v ch sp along until last 1/1/2/2/2/3/4 v sts. Make 1 dc st and turn, leaving 1/1/2/2/2/3/4 v sts unworked. 16/18/18/20/22/22/22 v sts. 

    Work a further 8/8/8/9/9/10/10 rows of v st without shaping until armhole measures 18/18/18/20/20/22/22cm 7/7/7/8/8/8.5/8.5in.

    Continue without shaping until back measures 56/58

    58/62/62/64/64cm  22.5/23/23in/24/24/25/25 in.  Fasten off. Cut yarn. 

    Front (work 2) 

    Ch 36/36/39/42/45/48/51 (3 ch count as 1st dc). 

    Work same as back until ** 10/10/11/12/13/14/15 v sts. 

    Armhole

    Fasten off and cut yarn. Place a removable stitch marker into 1st v st of row. Sk 1/1/2/2/2/3/4 v sts and reattach yarn. Ch 3 and v st into every v ch sp along. Work a dc into last st. Ch 3 and turn. 9/9/9/10/11/11/11 v sts.

     Decrease for v neck shaping 

    1. Sk 1 v st. Make a v st into next v ch sp. V st to end, make 1 dc in last dc, ch 3 and turn. 8/8/8/9/10/10/10 v sts. 
    2. Work pattern to last v st, turn, leaving last v st unworked. 

    Repeat last 2 rows until there are 3/3/5/5/7/7/7 v sts.

    Continue without shaping until back measures 56/58

    58/62/62/64/64cm 22.5/23/23in/24/24/25/25 in Fasten off. Cut yarn. 

    Flip one of the front pieces over so that you have a left side and a right side of neck. 

    Side panels: 

    Dc in every dc and ch space along the side of the front left panel, from hem to underarm stitch marker. Ch 3, turn.

    Work 0/0/0/1/1/2/2 more rows of dc. 

    Repeat for right front panel and both sides of back panel. You should have a total of 2/2/2/4/4/6/6 dc side rows on either side of the body. 

    Free crochet cardigan pattern. Free crochet cardigan worsted yarn. Free aran yarn crochet cardigan pattern pdf. Simple crochet cardigan patttern. Worsted weight sweater pattern free. Crochet patterns for women. Modern crochet sweater patterns.

    Side panels of size L are 4 rows of dc either side. 

    Seam sides of body and shoulders

    With RS facing, join left front to back with sl st join or a tapestry needle.

    Using either sl st join with your crochet hook or with a tapestry needle, join shoulder seams. 

    Sleeves: 

    Reattach yarn and work armhole as follows: 

    At this point you will be working into the side of the dc sts or the ch sp created by a v st on its side. 

    Ch 4, dc in same ch (counts as 1st v st). V st another 24/24/25/25/25/26/26 v sts evenly across armhole. Sl to join round. 

    Next round and every following round: 

    Ch 4, dc in same ch. V st in every v ch sp around. Sl to join. 

    Continue until sleeve measures 48/48/50/50/50/52/52cm 19/19/20/20/20/21/21in 24/24/25/25/25/26/26 v sts 

    Cuff 

    4 rows of dc in total. Try the sleeve on to see if you would prefer a longer or shorter cuff. 

    1. Sl st and ch 2, dc into top of every dc. Sl st to join round. 
    2. Sizes XS: Decrease 4 sts evenly across cuff.

     S-L: Ch 2 and dc in every other dc around.

     XL-3XL: Ch 2, *2 dc in next 2 sts, sk 1* repeat * to end. 

    1. Dc in every dc.
    2. Repeat row 3 once more. 

    Fasten off. Cut yarn. 

    Edging and button bands: 

    Starting at bottom left front, reattach yarn, ch 2 and dc in the top of every ch around (including side dcs and v sts), bottom edge, front right, collar and front left, Sl st to join with 1st dc of round. Ch 2 and dc every st around. Fasten off. 

    Place buttons at an equal distance down the right or left front button band. Sew them on. 

    Weave in ends and enjoy!

    Breeze v stitch crochet sweater. Crochet cardigan pattern free. Crochet cardigan patterns for beginners. Worsted weight crochet sweaters to make.

    Other free crochet patterns to try:

  • Patterns that combine knitting with crochet: the Jewel Hat Pattern

    Patterns that combine knitting with crochet: the Jewel Hat Pattern

    The Jewel hat falls under the categories of both knitting and crochet as it contains both techniques and it really does have the best of both worlds. You can mix crochet and knitting with the Jewel hat pattern and crochet this slouchy beanie with a crochet body and knit brim. Get the best of both worlds in one pattern. I’ll talk you through how it’s made and what skills and tools you’ll need to make it. 

    If you’d rather make the 100% crochet version of this hat, there’s a free pattern here.

    This post may contain affiliate links, meaning that if you decide to purchase any of the recommended products, I do receive a small commission at no cost to you.

    What is the Jewel hat? Why is it so special? 

    I’ve been a fan of both knitting and crochet for over a decade. I learned both at the same time and loved both for their different qualities. I had the idea to design this hat when I was looking for a quick beanie that mixed crochet and knitting in a stylish way.

    I also wanted to create something that a knitter could learn to make if they had any interest in crochet but weren’t sure where to start. I get really tired of crochet prejudice and stereotypes in the yarn world so I was determined to design something that was beautiful as well as easy to make. It’s a slouch beanie with a knit brim and a crochet body. If you’re feeling cute, you could also add a pom pom.

    This hat has introduced so many knitters to crochet! I love this design and I’m glad you enjoy it, too.

    The jewel hat is a slich beanie with a knit brim and a crochet body. It's a hat that mixes crochet and knitting.

    Here it is worked in Manos Del Uruguay Silk blend DK in child size (above). 

    Why knitting and crochet can be mixed for mega benefits.  

    Mixing knitting and crochet for this pattern is a lot of fun as you get the benefits of the stretchy knit brim with the speed of the crochet granny stitch clusters. Even though wonderful knit look methods and rib methods do exist for crochet, I don’t feel that any of them beat the K1 P1 rib. It’s really stretchy and doesn’t eat up as much yarn as crochet does. This means the hat is mostly doable with just one ball of yarn.

    I made my adult medium sample in Cynet Boho Spirit (Colourway Chic). It used less than 1 whole ball. 

    The crochet body is so quick that you could make this hat in an evening. You’re not working into stitches for the most part, just the chain space! 

    What size does the Jewel hat come in? 

    I designed the hat in 5 sizes:

    • Baby- 19 inches/48cm.
    • Child- 20 inches/51cm
    • Adult small (or tween)- 21 inches/ 53cm
    • Adult medium- 22 in/55cm
    • Adult large- 24 in/60cm

    It’s such a fun hat and makes an excellent last minute gift as it works up so quickly. When I first introduced the Jewel hat, knitters were curious as to how it worked and whether they could crochet well enough to pull it off. You absolutely can! The pattern not only has clear instructions with a glossary of terms and stitches but there are plenty of photos and even an instructional video showing you how to make it. With all of these added extras, you really can’t go wrong. 

    Worried you can’t crochet well enough to make this hat?

    You really don’t need to be a crochet expert to make this cute hat. All you need is to know how to make a chain, make a double crochet stitch (UK treble) and decrease stitches. You will also need to know what a chain space is but don’t worry, I explain all of these things in relevant blog posts as well as the youtube tutorial that shows you how to make the Jewel hat.

    I’ve made two of these hats now and have the yarn ready for a third. Very straight forward pattern. I’m not particularly great at crochet but got lovely results which have been greatly admired. Cygnet Boho Spirit DK is prefect for this pattern.

    If you’d like to get started with crochet or brush up on your crochet skills, I have a list of excellent resources here for beginners. 

    On my youtube channel, you will find the crochet playlist for absolute beginners. I cover everything from making a slipknot to working your first crochet stitches. 

    In my pattern store, I have a crochet stitch guide for beginners. This is a guide that compliments your learning when watching tutorials or reading patterns. There are the UK and US terms for all of the stitches in there as well as instructions and detailed photographs of the stitches.

    On my knit and crochet blog, I have a series of blog posts showing you what certain crochet terms or methods involve. A really useful one for the Jewel hat is “What is a chain space?” 

    Tools required to make this easy slouchy beanie. 

    • 3.75mm needles, either DPN or 80cm circular for magic loop.
    • 4.5mm crochet hook or size required for gauge. 

    Please do make sure you do a swatch as I have quite loose tension. You may need to go up a size or 2 for yours! 

    Gauge: 1×1 rib 6 sts per 1in 2.5cm

    Thank you for supporting my work. As you know, I don’t run ads on my blog posts. If you’d like to show your support by leaving a tip, you can do so at Ko fi here. Thank you for visiting my blog!

    Jewel hat tutorial on Youtube 

  • How to create crochet fabric that drapes.

    How to create crochet fabric that drapes.

    In this post, I’ll be talking about drape in crochet and how you can make a few simple tweaks to ensure your crochet fabric hangs as you want it to.

    You may have heard that crochet fabric doesn’t look as good as knit fabric. Did you know that it can? Here I will explain how to create fabric that drapes!

    If you’re a frequent knitter and you’ve dabbled with crochet, one of the main observations you may have made is the difference in drape. You may have heard knitters say that they don’t like the ‘stiff’ fabric that crochet produces, but I want to tell you that it doesn’t have to be stiff and boxy. Here I will show you how to create crochet fabric that drapes well. 

    What is drape and why does it matter in crochet?

    Drape is the way that a fabric flows or hangs. It allows it to sweep, gather or float off the body or sway in the wind. It’s gorgeous and it is absolutely what we want when it comes to shawls and garments. Think of chiffon sarongs, velvet curtains or lace shawls. How something drapes is down to a few factors of which I will explain below. 

    Semi circle crochet shawl pattern Eden cottage yarns nateby 4ply

    Example above: The Daphne shawl.

    As a rule, crochet stitches do tend to produce a thicker, denser fabric as the method of crochet requires wrapping and ‘knotting’ in the way the stitches are formed. If we were to compare crochet fabric with knit fabric according to the recommended hook and needle sizes on a ball band, the crochet will most probably be thicker, but this does not mean that crochet fabric is always stiff and dense. It is a common misconception that crochet fabric makes rubbish garments and that it is always stiff. 

    You can create drape with crochet fabric and it doesn’t just have to be with lace and openwork. 

    There are many ways that you can create looser, draping fabric with crochet that doesn’t have to result in it being completely see through and vulnerable to door handles. 

    This could be done in several ways: 

    1. The size of the crochet hook used. 
    2. The direction of the stitches e.g. vertical is less see through than horizontal. 
    3. The thickness of the yarn. 
    4. The stitch pattern. 
    5. The yarn used. Some yarns are just softer and have more drape, or a thinner feel to them. Not all 4ply and DK is the same thickness, for example. 
    6. Blocking. 

    Size matters when creating drape.

    If you use the crochet hook size recommended on the ball of yarn, I can almost guarantee that you will end up with a dense fabric. If you go up half a millimetre or a full millimetre, it will become a looser fabric. You can keep experimenting with this until you get to a hook size that creates the drape you want.

    Single crochet stitch is too dense for drape

    Horizontal vs vertical can improve your results when creating drape in crochet fabrics. 

    If you turn a crochet piece on its side, the layout of the stitches and the drop changes. This could help with drape too (depending on yarn). 

    Thickness of the yarn can affect drape 

    Using an aran or chunky yarn will cause problems if you don’t go up a hook size. If you have loose enough tension, you can get away with the recommended hook size, but if you can’t, you need to increase your hook size. Here is an example of a chunky/bulky weight yarn that has drape in a cardigan. 

    Chunky crochet cardigan pattern

    Believe it or not, you can get chunky weight yarn to drape. Creating crochet fabric that drapes with chunky yarn may seem unlikely but it is possible. Above is my Starburst crochet cardigan pattern and although it asks for chunky yarn and a 6mm hook, it has drape! It hangs off the body and the sleeves drape too. It is not a stiff jacket, it’s a cardigan. Bear in mind that although the pattern may ask for a specific size, you will know from your test square whether the finished item will drape how it is supposed to or not. Most makers will achieve the desired fabric if they go up a hook size, as my tension seems to be quite loose! You should always test your personal tension with the yarn to see if the yarn is thin or thick enough! 

    The stitch pattern used will affect the finished result. 

    The stitch pattern you use affects drape considerably. For example, double (UK treble) crochet is a longer, looser stitch than its predecessor, the single crochet stitch. 

    Single crochet (UK Double) is also the most dense stitch you can make. It is therefore brilliant for items that require structure, stiffness or an opaque, tight fabric. Here are some examples of where single crochet works wonders: 

    • amigurumi (pictured below)
    • baskets
    • bags
    • rugs 
    • hard wearing throws e.g. dog blankets 
    • Pet beds 
    • Bath mats
    • Face scrubbies 
    • Pouches and cases 
    Martia alien amigurumi crochet doll uses single crochet stitch

    It’s not just single crochet that will cause stiffness though. 

    Using any stitch can cause stiffness. All you have to do is use a crochet hook a couple of sizes smaller than the yarn recommends. It works just the same with knitting. 

    Yarns 

    We have briefly covered the yarn and the recommended sizes that come on the ball band. In my experience, the ball band isn’t always correct. This is because they are a guide rather than an absolute. That ball band does not take into account what your personal tension is. I was also saying that not all 4ply or DK yarns are the same. This is where wraps per inch (wpi) comes in handy. I will explain further in another blog post, but basically: 

    Working out WPI: 

    Wrap your yarn around a pencil or a pair of knitting needles for 3-4 inches. Using a ruler, measure how many wraps per inch. This gives you a clear idea of how thick your yarn actually is.  Although Cygnet boho spirit says it is DK, the recommended hook/needle is 4.5-5mm. If I were to work out wpi with Cygnet boho and Cygnet DK, they would be different thicknesses. 

    Blocking creates drape!

    If you are using natural fibres, blocking is invaluable for altering the drape and the feel of the finished item. It can help it to hold it’s shape and open out any stitches that are deliberately loose e.g. lace stitches. You can also block acrylic by ‘killing’ the fabric with steam or a warm iron just hovering above it, but most of the time, acrylic can drape if you just use the right hook. 

    Overall, I think experimenting with crochet and trying out crochet drape is worth the time. I don’t think knitters should shy away from crochet because the stitches are different.

  • Crochet Shawl Pattern: The Daphne Shawl.

    Crochet Shawl Pattern: The Daphne Shawl.

    This is a free pattern for the Daphne crochet shawl, a half-circle shawl with elegant drape and an optional picot edging. If you’d prefer the ad free version of this pattern, you can get the PDF on Ravelry.

    Simple half circle crochet shawl too make. Free crochet shawl patterns. Fingering weight crochet porjects. eden Cottage Yarns Nateby 4ply. Crochet shawl using mesh stitch crochet. Fishnet stitch crochet shawl.

    The Daphne shawl is a half circle shawl with a generous wingspan for wrapping up or hanging dramatically across your shoulders. Named after my daughter and my favourite author, Daphne Du Maurier, this shawl is more simple than it seems, but still beautiful and unusual. The delicate picot edging adds additional interest if worked in a contrasting colour but it is optional. 

    The pattern is written using US crochet terms throughout. 

    If you don’t know your US/UK crochet terms, there’s a handy guide here.

    Materials needed: 

    • 200g/7oz 800m/875yd of 4ply (fingering weight) yarn such as Nateby 4ply by Eden Cottage Yarns. The colourway here is Thunder on a Merino/Nylon/Stellina sock base. 
    • 20g/0.7oz; 80m/88yds of 4ply (fingering weight yarn for the contrast trim. This shawl uses a 20g mini skein from the RiverKnits indigo gradient set of Bfl minis.
    • 3.75mm hook. (US F/5)

    Gauge: 16dcs across 16 rows in dc on a 4in (10cm) tension square using a 3.75mm (US F/5) hook. 

    Glossary: 

    CcContrast colour
    Ch Chain 
    Ch sp The space in the row below created by previous chains
    Dc US Double crochet
    McMain colour
    SlSlip stitch 
    St(s)Stitch(es)

    Shawl measures: 

    165cm (64”) long and 68cm (27”) deep

    All instructions are given in US crochet terms. 

    Instructions: 

    Yoke: ch 3 will count as first dc of each row starting at row 2

     To create the half circle, we will increase by 7 sts every row. 

    Row 1: With mc, ch 10. Turn

    Row 2: 1 dc into 4th ch from hook. 1dc in every st to end. Ch 3 (7 dc)

    Row 3: Dc in top of last dc *2dc in every st across*. Ch 3 and turn.(14 dc)

    Row 4: Dc in top of last dc. *1 dc in next st, 2dc in next st*. Repeat* ending with 1 dc in last st. Ch 3 and turn. (21dc)

    Row 5:Dc in top of last dc. *1 dc in next 2 sts, 2dc in next st*. Repeat* ending with 1 dc in last 2 sts. Ch 3 and turn (28dc)

    Row 6:Dc in top of last dc. *1 dc in next 3 sts, 2dc in next st*. Repeat* ending with 1 dc in last 3 sts. Ch 3 and turn (35dc)

    Row 7: Dc in top of last dc. *1 dc in next 4 sts, 2dc in next st*. Repeat* ending with 1 dc in last 4 sts. Ch 3 and turn (42dc)

    Row 8: Dc in top of last dc. *1 dc in next 5 sts, 2dc in next st*. Repeat* ending with 1 dc in last 5 sts. Ch 3 and turn (49dc)

    Row 9: Dc in top of last dc. *1 dc in next 6 sts, 2dc in next st*. Repeat* ending with 1 dc in last 6 sts. Ch 3 and turn (56dc)

    Row 10: Dc in top of last dc.*1 dc in next 7 sts, 2dc in next st*. Repeat* ending with 1 dc in last 7 sts. Ch 3 and turn (63dc)

    Row 11: Dc in top of last dc. *1 dc in next 8 sts, 2dc in next st*. Repeat* ending with 1dc in last 8 sts. Ch 3 and turn (70dc)

    Row 12: Dc in top of last dc. *1 dc in next 9 sts, 2dc in next st*. Repeat* ending with 1dc in last 9 sts. Ch 3 and turn (77dc)

    Panel 1 

    Row 1: Dc in top of last dc. *Ch 2, sk 2 and dc in next st*. Repeat * to end 2dc in last dc.  Ch 3. Turn. 

    Row 2: Dc in top of last dc. Ch 2 and dc in next ch sp. Repeat to last ch sp. 2dc in last dc. Ch 3 and turn.  

    Row 3: 2dc in 1st dc, [1dc in next dc, 2dc in next ch sp] repeat [ ] to last st. 2dc in last st. Ch 3, turn. 

    Row 4 & 5: 2dc in 1st dc, dc every dc to last dc. 2dc in last dc. Ch 3 and turn.

    Row 6: 2dc in first dc, 1 dc in next dc, [2dc in next dc, 1 dc in next dc] to last dc, 2dc in last dc. Ch 3 and turn. 

    Panel 2: 

    Row 1: Dc in top of last dc. *Ch 2, sk 2 and dc in next st*. Repeat * to end 2dc in last dc.  Ch 3. Turn. 

    Row 2:Dc in top of last dc. Dc again in same st. Ch 2 and dc in next ch sp. Repeat to last ch sp. 2dc in last dc. Ch 3 and turn.  

    Row 3 and 4: As row 2. 

    Row 5: 2dc in 1st dc, [1dc in next dc, 2dc in next ch sp] repeat [ ] to last st. 2dc in last st. Ch 3, turn. 

    Row 6-7: 2dc in 1st dc, dc every dc to last dc. 2dc in lats ch. Ch 3 and turn.

    Row 8: 2dc in first dc, 1 dc in next dc, [2dc in next dc, 1 dc in next dc] to last dc, 2dc in last dc. Ch 3 and turn.

    Panel 3:

    Row 1:  Dc in top of last dc. *Ch 2, sk 2 and dc in next st*. Repeat * to end 2dc in last dc.  Ch 3. Turn. 

    Row 2: Dc in top of last dc. Dc again in same ch. Ch 2 and dc in next ch sp. Repeat to last ch sp. 2dc in last dc. Ch 3 and turn.  

    Row 3 and 4: As row 2. 

    Row 5: 2dc in 1st dc, [1dc in next dc, 2dc in next ch sp] repeat [ ] to last st. 2dc in last st. Ch 3, turn. 

    Row 6-7: 2dc in 1st dc, dc every dc to last dc. 2dc in lats dc. Ch 3 and turn.

    Row 8: 2dc in first dc, 1 dc in next dc, [2dc in next dc, 1 dc in next dc] to last dc, 2dc in last dc. Ch 3 and turn.

    Panel 4: 

    Row 1:  Dc in top of last dc. *Ch 2, sk 2 and dc in next st*. Repeat * to end 2dc in last dc.  Ch 3. Turn.  

    Row 2: Dc in top of last dc Dc again in same ch. Ch 2 and dc in next ch sp. Repeat to last ch sp. 2dc in last dc. Ch 3 and turn.  

    Row 3 and 4: As row 2. 

    Row 5: 2dc in 1st dc, [1dc in next dc, 2dc in next ch sp] repeat [ ] to last st. 2dc in last st. Ch 3, turn. 

    Row 6-7: 2dc in 1st dc, dc every ch to last dc. 2dc in last ch. Ch 3 and turn.

    Row 8: 2dc in first dc, 1 dc in next dc, [2dc in next dc, 1 dc in next dc] to last dc, 2dc in last dc. Ch 3 and turn.

    Panel 5: 

    Row 1:  Dc in top of last dc. *Ch 2, sk 2 and dc in next st*. Repeat * to end. 2dc in last dc.  Ch 3. Turn.  

    Row 2: Dc in top of last dc. Dc again in same ch. Ch 2 and dc in next ch sp. Repeat to last ch sp. 2dc in last dc. Ch 3 and turn.  

    Row 3 and 4: As row 2. 

    Row 5: 2dc in 1st dc, [1dc in next dc, 2dc in next ch sp] repeat [ ] to last st. 2dc in last st. Ch 3, turn. Fasten off. 

    Edging (optional) 

    Attach cc yarn. Sl into first dc st of shawl edge. Ch2, dc into same st, ch 2 and sl into same st again.. [Sl next 2 dc sts, ch 2, make a dc, ch 2 and sl into same st]. Repeat [ ] to end. Fasten off. 

    Block to measurements and weave in ends. 

    Half circle crochet lace shawl pattern free., Simple shawls to crochet free patterns. Free shawl patterns for crochet. Mesh stitch crochet.
    Easy crochet shawl patterns to make. Crochet shawl pattern pdf free. Lace shawls to crochetl. Crochet half circle wrap.
  • There’s more to crochet than granny squares but it’s a good place to start

    There’s more to crochet than granny squares but it’s a good place to start

    It’s a common misconception that crafters make to think that crochet is only about granny squares and anything that vaguely resembles a granny square. That’s not true. There is so much more to crochet than granny squares but it is a good place to start and I will tell you why in this post. 

    What else can I crochet? 

    First, we should talk about what other options there are for crocheters who don’t want to have a go at crochet squares. There are many things you can crochet without having to make anything square. Using any of the four basic crochet stitches, you can create garments, bags, blankets, toys, home decor and much much more. 

    All crochet stitch patterns are made of one of the following stitches: 

    • Single crochet (UK treble) 
    • Half double crochet (UK half treble) 
    • Double crochet (UK treble) 

    Every stitch following these stitches is just a variant or a ‘build’ on the basics. To make a triple stitch (UK triple treble) you make a double crochet twice. To make a shell or fan stitch, you need to make 5 double crochet stitches into the same chain. To make a v stitch, you make two double crochet stitches into the same chain, with one chain separating them to create the v shape. 

    If you do want to start with the granny square, that’s fantastic! You can learn a few things from this clever shape: 

    1. You can learn how to build in rounds. 
    2. Learn to change colours. 
    3. Learn to make corner spaces. 
    4. Learn how a chain space works. 
    5. Keep them small or make something massive! 

    As you can see, you can learn a lot from that humble square. There’s something pretty and comforting about a granny square throw. This one is available as a free pattern here.

    The humble granny square is a great place to start and here are some further posts to help you get going: 

    Free Granny Square Patterns to try:

    Kits and patterns that build on the granny square:

    These kits and patterns contain affiliate links. This means that if you choose to purchase, I do receive a small commission at no extra cost to you.

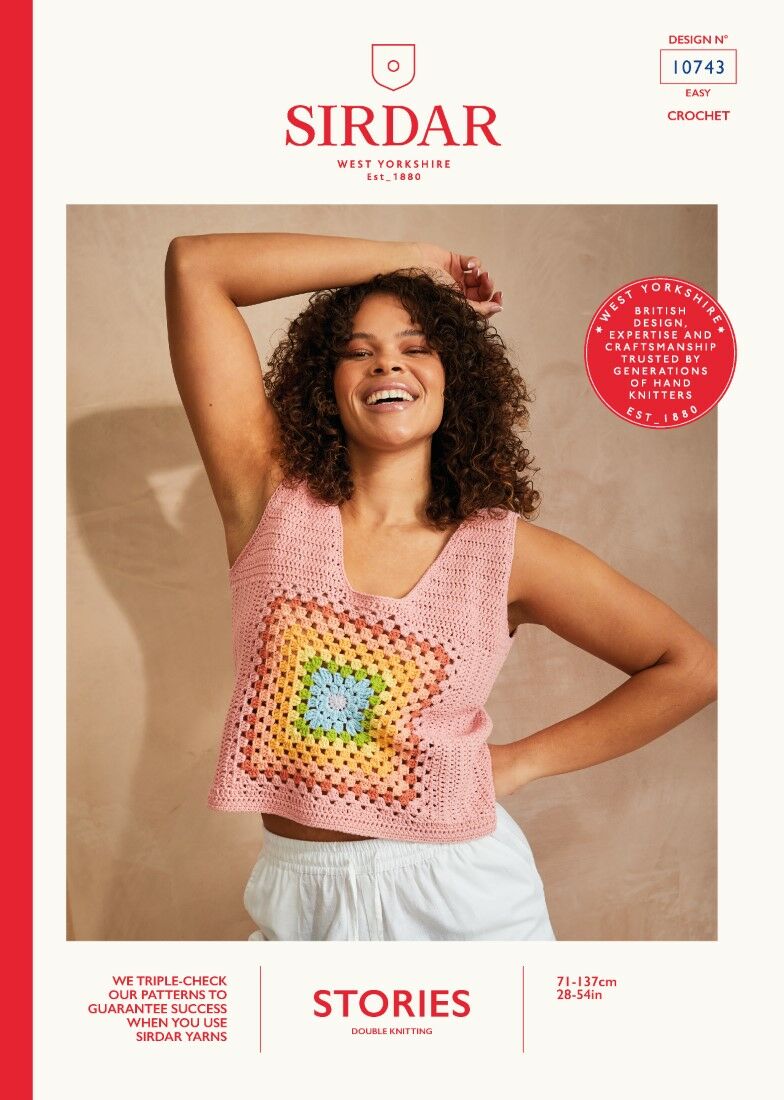
    Sirdar Stories Crochet Metro Top

    Sirdar Stories: Poetic Pastels Our Metro Square Top puts the fashionable crochet granny square front and centre. If you haven’t tried a granny square to wear yet, this is an easy crochet pattern to get you started. As well as your granny square, you’ll crochet panels of double crochet and use gradual shaping to create the flattering deep u-shaped neckline, tapered shoulders and neat fit that will make this top a summer staple. Great for beginners!

    granny square tank top pattern Things to make with granny squares.

    Sirdar Stories DK Urban Hues Cardigan Crochet Pattern

    Crochet some pretty pastel granny squares, add a flattering open neckline and wide airy sleeves to make your summer essential Urban Hues Cardigan. Perfect pattern for intermediate. Use panels of granny stripes to get a neater fit and give your new favourite crop cardigan a crisp finish with a double crochet trim.

    Crochet granny square tops to make. Free crochet granny square patterns
  • Flock socks knitting pattern. Cuff down sock knitting pattern.

    Flock socks knitting pattern. Cuff down sock knitting pattern.

    The Flock Socks sock knitting pattern.

    This design features a ‘flock’ of birds or butterflies: you decide! This blog post is for a free sock knitting pattern showing you how to make these cuff down socks. If you’d prefer the ad-free PDF, you can get it on Ravelry here.

    The flock socks are a fun way to make the most of texture with some simple stitch repeats. This sample is knit in a 100% hardy wool yarn but you could use a sock yarn with nylon for extra durability if you’d prefer. They are socks knit from the cuff down with a square, integrated heel, some short row shaping and a grafted toe.

    slip stitch textured sock knitting pattern

    The socks feature a square (Dutch heel) that is split into 3 after some increases and decreased back down to create a sturdy, rectangular shape under the heel.

    You can see a quick video of how the heel is made here: 

    A note about the yarn:

    I used Eden Cottage Yarns Oakworth 4ply. This isn’t strictly a ‘sock yarn’ but the wool is crisp and durable. I haven’t had to darn any heels or toes yet! If you like a sock made with natural, breathable fibres that will also keep your feet warm, try it! I used their special Christmas colourway (it was limited edition, so they don’t currently have it) but there are so many other beautiful shades available.

    Materials required for this sock knitting pattern:

    • 100g of 4ply sock yarn such as Oakworth 4ply, (100% Polwarth wool) by Eden Cottage Yarns (400m/436yds per 100g/3.5oz)
    • Darning needle
    • 4 Stitch markers
    • 2.5mm circular (80cm cable for magic loop) or DPNs or size needed for gauge.

    Gauge:
    30 sts and 35 rows in pattern per 10cm (4”)

    Leg/foot circumference:
    Size 1: 7 in/17cm
    Size 2: 8 in/20cm
    Size 3: 9 in/23cm

    Glossary: 

    K: Knit 

    K2tog: Knit two stitches together. 

    Ktog: Knit all the strands together with one stitch. 

    LH: Left hand

    M1L: Pick up the bar between the stitch you have just knitted and the one you are about to knit, bringing the needle from the front to the back. Knit into the back of the stitch. 

    M1R: Pick up the bar between the stitch you have just knitted and the next stitch, bringing the needle from the back to the front. Knit into the front. 

    Sl: Slip a stitch from left hand needle to right hand needle. 

    P: Purl

    P2tog: Purl two stitches together.

    PM: Place marker

    PSSO: Pass slipped stitch over the knitted stitch. 

    RH: Right hand

    RS: Right side

    SKP: Slip one, knit one, PSSO. 

    SM: Slip marker 

    St(s): Stitch(es)

    WS: Wrong side

    How to knit the Flock Socks.

    Start your Flock socks by casting on at the cuff

    Loosely cast on 50 (60 70) sts, join to work in the round, being careful not to twist sts..

    Work in 1×1 rib for 2.5cm/1 in.

    Knit the leg

    Place a marker (marker 1) after the first 25 (30, 35) sts to establish halfway point. 

    K all sts for 1 round. 

    Round 2, 4, 6: *K5, Sl 5 purlwise with yarn in front; repeat from * to end. 

    Round 1, 3, 5, 9, 11: K all sts. 

    Round 7: *K7, pick up the 3 strands and the next st from LH needle. Ktog with 3 strands. K2; repeat from * to end. 

    Round 8, 10, 12: *Sl 5 purlwise with yarn in front, K5; repeat from * to end. 

    Round 13: *K2, pick up the 3 strands and the next st from LH needle. Ktog with 3 strands. K2, K5; repeat from * to end. 

    These 13 rounds form the flock pattern. Repeat Rounds 1-13 until piece measures 19 (20, 21)cm/7.5 (7.75, 8.25) in from cast on, ending with a 7th or 13th round. 

    Shape the heel


    Heel increases are worked on every K round. Heel sts (underside) stay in K st after this point, with flock pattern continuing along instep sts. 

    In this next section, the stitch counts on the heel needle require increasing to whole numbers for size 1 and 3. 

    Round 1: 

    Size 1: M1R, PM (marker 2), K1, M1L, K24, PM (marker 3), M1L. SM (marker 1). 3 sts increased. Work in flock pattern to end. There are now 26 sts between markers 2 and 3. 

    Size 2: M1R, PM (marker 2), K30, PM (marker 3), M1L. SM (marker 1). 2 sts increased. Work flock pattern to end. 

    Size 3: M1R, PM (marker 2), K1, M1L, K34, PM (marker 3), M1L. SM (marker 1). 3 sts increased. There are now 36 sts between markers 2 and 3. Work in flock pattern to end. 

    53 (62, 73) sts total. 

    Round 2: 

    K all stitches on heel needle(s), work flock pattern on instep, slipping markers as you come to them. 

    Round 3: 

    K to marker 2, M1R. SM, K to marker 3, SM, M1L, K to marker 1, SM, work flock pattern to end. 

    Repeat Rounds 2 and 3 until you have created 18 (20, 24) stitches on the heel needle(s). 44 (50, 60) sts on heel needle(s). 69 (80, 95) sts total. 

    Turn the heel of your sock: 

    Working only with the first 44 (50, 60) sts, continue as follows: 

    • Short row 1: (RS) K9 (10,12) to marker, SM, K 17 (19,19) sts, S1, K1 PSSO. 1 st decreased. This will now be referred to as SKP. Turn.
    • Short row 2: (WS) P 8 (9, 10) sts, P2tog. 1 st decreased. Turn.
    • Short row 3: (RS) Sl 1 knitwise, K to 1 stitch before the gap which has formed. SKP. Turn. 
    • Short row 4: (WS) Sl 1 purlwise, P until 1 stitch before gap. P2tog. Turn. 

    Size 1: On last P row, P3tog at the end. 26 sts. 

    Repeat Short Rows 3 and 4 until there are 26 (30, 36) sts between the beginning of the round and the halfway marker (marker 1). This was the amount that you started with and your work should be right side facing with marker 2 on your right hand needle. 51 (60, 71) sts total. 

    Set up in the round: 

    Remove marker 2. Insert needle as though making a M1R but instead of knitting, slip the twisted stitch on to RH needle. K1 and PSSO. K to marker 3, remove marker 3, insert needle as though making a M1L, but slip the twisted stitch onto LH needle and K2tog. SM, work flock pattern to end. 

    Size 3: Increase 1 st on sole of foot sts on next round. 72 sts total. 

    Knitting the foot: 

    Continuing in flock pattern for instep stitches, and K all sts on sole of foot, until piece measures 3.5 (5, 6)cm/1.5 (2, 2.25)in less than desired length, ending with a 7th or 13th round of flock pattern. 

    On last round: 

    Size 1: Increase 1 st after halfway marker (marker 1). There are now 26 sts between markers. 

    Size 3: move halfway marker (marker 1) one stitch to the left so there are 36 sts between markers.

    Finishing at the toe of the sock.

    Round 1: *SKP, K 22 (26, 32) K2tog; repeat from * to end. (4 sts decreased in total) 

    Round 2: K all sts. 

    Round 3: *SKP, K to 2 sts before marker, K2tog; repeat from * to end. 

    Repeat Round 2 and 3 until you have 36 (42, 52) sts in total. 

    THEN, decrease on every round until you have 20 (20, 24) sts in total. Remove marker 1. 

    Finishing: 

    Using kitchener method, graft the remaining stitches together to close the toe. Weave in ends. Click here to see the step by step photo tutorial for this.

    Check out some of my other sock knitting patterns:

    Simple cuff down DK socks.

    Andalusian stitch socks.

    Basic 4ply sock pattern.

  • Cuddle and play crochet cat blanket kit. Crochet kits for baby gifts.

    Cuddle and play crochet cat blanket kit. Crochet kits for baby gifts.

    This article highlights the crochet cat blanket kit by Dreamy Wool. Crochet kits for baby gifts have everything you need for that special, handmade gift.

    Whether you are more of an avid amigurumi creator or a blanket connoisseur, these crochet cat kits combine both of those things to give you a toy that unravels to become a blanket!

    This article contains affiliate links. This means that if you choose to purchase, I earn a small commission at no cost to you.

    This cat crochet kit is adorable, and it’s a popular hit with those looing for a simple crochet gift they can make themselves. Take the guesswork out of it with a Dreamy Wool crochet cat blanket kit.

    Cuddle and Play Cat Blanket Kit

    tabby cat crochet blanket kit. Image shows little girl holding two crochet cat toys while using a crochet cat blanket.

    This crochet cat kit comes in three variations:

    • A baby blanket and cushion kit. (RRP £66.98)
    • A child sized blanket kit. (RRP £76.96)
    • An adult sized blanket kit. (RRP £86.94)
    Cat crochet toy. Crochet blnaket ideas for babies and kids. Crochet cat throw pattern.
    Left to right: Silver sprinkles/stripes, peppercorn and marmalade/stripes.

    This adorable crochet cat also comes in five colour variations:

    • Marmalade
    • Marmalade/Stripes
    • Silver Sprinkles/Stripes
    • Peppercorn
    • Strawberry ice cream
    crochet a cat toy that becomes a blanket. Cuddle and play cat crochet blanket kit.
    Cat kit shown in Strawberry Ice Cream

    The patterns for these kits are intermediate level. They are designed by crochet designer Aneta Wawro (Crochet Arcade) and include all the materials to make the cat and blanket that you choose.

    Materials not included in the kit:

    You can also get their crochet starter kit which is a crochet hook, stitch markers and a darning needle!

    Crochet starter kit for beginners. Learn to crochet with essential tools. Cheap crochet starter kit.

    These kits make excellent gifts as a kit, or for you to make and then give to someone who loves cats. If you want to learn more about Dreamy Wool’s cuddle soft chunky yarn, you can see it here.

    Crochet cat toy. Crochet blanket kits. Cat baby blanket crochet pattern. Crochet baby blanket patterns and kits.

    Overall, these adorable crochet cat blanket kits make excellent gifts for a baby shower, christening or if choosing the larger blanket…your sofa!

  • Free Beginner Granny Square Blanket Pattern

    Free Beginner Granny Square Blanket Pattern

    Crochet this beginner granny square blanket with a soft DK yarn for extra cosiness.

    I’ve used Cygnet Pure Wool Superwash DK for my granny square blanket as it is soft, durable and feels lovely in a blanket.

    free granny square blanket for beginners. Learn to crochet a granny square throw. Free crochet patterns. Contemporary crochet patterns free.

    In this article, I will guide you through making your first ever crochet blanket! Please note that I am a Woolbox affiliate, and if you choose to purchase the yarn via the links I have provided, I will receive a small commission at no extra cost to you.

    How to crochet a basic granny square:

    Although this video doesn’t show the exact same granny square as the one listed in the pattern, watching this video should help you to get the hang of it! All granny squares are the same in the general principle: start in the centre and grow each corner. It doesn’t matter what stitches you do, they’re all going the same way!

    Stitches you need to know in order to make this granny square blanket.

    Double crochet (UK Treble)

    Abbreviations: Dc (US) Tr (UK)

    The Dc is one of the most common crochet stitches you will come across. It’s speedy and tall. Your work will grow quickly. 

    Chain 3 and turn. Yarn over hook, insert hook, yarn over and pull through a loop. Yarn over and pull through 2 loops. Yarn over and pull through 2 loops. 

    When making a turning chain, always chain 3

    Start your practice by making a square of dc. Start by chaining 15. (12 ch + 3 ch for turning ch)

    To fasten off: Just pull the last loop through and cut!

    Beginner crochet has its hiccups. Here’s some troubleshooting:

    1. My piece is getting narrower. 

    This could be a tension issue e.g. when you chain, you are pulling too tight and creating small, impenetrable loops. It could also be that you are forgetting your turning chain at the end. Another possibility is that when you turn the work around, you aren’t crocheting into the 4th chain from the hook. Always check to make sure you are starting in the 4th chain from hook. 

    1. My piece is getting wider.

    The answer is usually that there are too many double crochet stitches either end. Sometimes when we turn the work around, we can miscount and put the next dc into the 3rd chain from hook, not the 4th. This then gives us an increase at the end of the work. For the first few rows, you really have to check where you are putting your hook. Count the amount of crochet stitches that you have too. Even the pros sometimes add an extra stitch without noticing!

    1. My stitches don’t look tall enough. 

    Make sure that you are following the dc instructions. Yarn over before inserting the hook every time

    1. I can’t crochet into the chain, 

    This could be because your chain is too narrow. If you are pulling the yarn too tightly (common with beginners) you won’t be able to use the chain. Try loosening your grip or use a hook 1mm larger when chaining. 

    1. My piece is starting to become rounded.

    You are probably putting too many dc stitches into either end, and accidentally working into the sides rather than just across the top. Stop, take a deep breath and start again. Crocheting when you are tired or distracted isn’t worth it. Trust me! I’ve done it many times.

    Master granny squares with these tips:

    Tips: 

    1. Crochet patterns are always written with abbreviations. Make yourself familiar with the glossary on a pattern, as it will explain what each abbreviation means.
    2. If preferred, you can keep track of where you are by marking each row/round with a pencil.
    3. Always check patterns to see if they are written using US crochet terms or UK crochet terms. It makes a big difference!

    Materials needed: 

    For your granny square blanket, you will need:

    1. 5 balls of Navy for colour A. (250g)
    2. 2 balls of Gold for colour B (100g)
    3. 2 balls of lt. Grey for colour C (100g)
    4. 4 balls of Copper for colour D (200g)
    5.  7 balls of cream for colour E.  (350g)

    If you are going to substitute yarn brands, make sure that the meterage on the ball is the same or similar. Check out my article ‘The best granny square yarns’ to find the substitutes I recommend.

    Glossary 

    Ch(ain) : Make a chain. Insert hook, yarn over and pull through loop. 

    Ch(ain) space

    Dc: Double crochet. Yarn over hook, insert hook, yarn over and pull through 2 loops on hook. Yarn over and pull through 2 loops on hook. 

    Dc5tog: Yarn over as though to make a dc. Insert hook, yarn over and pull through 2 loops. Leave remaining loops on hook (2 loops), yarn over, insert hook, yarn over and pull through 2 loops. Leave remaining loops on hook (3 loops), yarn over, insert hook, yarn over and pull through 2 loops on hook leaving remaining loops on hook (4 loops) yarn over, insert hook, yrn over and pull through 2 loops, leave remaining loops on hook (5 loops) yarn over, insert hook, yarn over and pull through 2 loops on hook, leave remaining loops (6 loops) on hook. Yarn over, insert hook, yarn over and pull through all remaining 6 loops on hook.

    Sl st: Insert hook into chain, yarn over and pull through. No height should have been added. 

    Part 2: Starting the squares

    What you will need: 

    1. Your chosen yarn in order of appearance. I have started with navy blue to match the blanket sample.
    2. 1 pair of scissors to cut the yarn.
    3. A 4mm crochet hook, or the right sized hook for your yarn.

    Round 1: 

    • With colour A, chain 4 and sl st into the 1st chain (4th chain from hook) to make a ring. 
    • Chain 2 (counts as 1st dc). Yarn over hook. Work dc5tog into the ring. 

    This is your first bobble stitch cluster. 

    • Chain 2 (you may want to chain 3 if it seems too tight) and work 5dctog into the centre of the ring. 
    • Repeat two more times. Sl st into top of 1st dc cluster to close the round.

    Round 2: 

    1. Sl st across 1st dc cluster until you get to the 1st chain space.
    2. Using clasp weft join, or by tying colour B to the strand of colour A, yarn over and insert hook into the chain space.Make a dc 5tog.
    1. Chain 1 and work another dc5tog into the same chain space.
    1. Chain 2 (or 3 if it is too tight/short) and dc5tog into the next chain space. Chain 1 and work 5dctog into the same chain space.
    2. Repeat step 4 until you have 4 corners. Each corner should have 2 bobble stitch clusters. Sl st into the top of the first cluster to close the round.

    Round 3: 

    At this point, you will now have to work a single crochet bobble stitch between corners. Look out for it! 

    1. Using clasp weft join, or by tying colour C to the strand of colour B, yarn over and insert hook into the chain space.Make a dc 5tog. Chain 1 and work another dc5tog into the same chain space.
    1. Chain 2 (or 3 if it is too tight/short) and dc5tog into the next chain space. This should not be a corner.
    1. Chain 2. Make a dc 5tog. Chain 1 and work another dc5tog into the same chain space. Chain 2.
    1. Complete the round by repeating steps 7 and 8 until you finish the last corner. Sl st to join with the 1st bobble cluster of the round.

    Round 4-6: 

    1. Using clasp weft join, or by tying the next colour to the strand of the previous colour, yarn over and insert hook into the chain space.Make a dc 5tog. Chain 1 and work another dc5tog into the same chain space.
    1. Chain 2 (or 3 if it is too tight/short) and dc5tog into the next chain space. This should not be a corner.
    1. Repeat step 11 (Repeat once more for round 5 and twice more for row 6).
    1. Chain 2. Make a dc 5tog. Chain 1 and work another dc5tog into the same chain space. Chain 2.
    1. Complete the round by repeating steps 10 and 11 until you finish the last corner. Sl st to join with the 1st bobble cluster of the round.
    1. Using the border colour, chain 3 into the first chain space of the round. Make 2 more double crochet stitches.
    2. Dc into the top of every following bobble stitch, and dc twice into every chain space (2 dc for corner chain spaces).
    3. Sl st with the 1st dc of the round to close the square.

     Repeat all steps a total of 24 times. 

    Joining your granny squares: 

    We join the squares using slip stitch (sl st) which is a crochet technique that you have learned already when making the granny square. The only difference here is that the slip stitches will become the seam rather than the end of a round. 

    When you use a slip stitch join, one side of the piece (right side) will lie flat and the other will have a ridge (wrong side) this is completely normal and is to be expected. Just make sure that you join all of your squares right side to right side and we won’t have a problem! 

    More help on joining squares is here.

    Written instructions: 

    Place your two squares right sides together. The stitches should all lie parallel. 

    Working with outside loops only, sl st each st across to join. Make sure that you are only picking up the outside loops as this will affect the overall look of the square. 

    To join:. Starting at top right of the squares held together, insert your hook into the first outer loop of the square closest to you, picking up a loop. Insert your hook into the outer loop on the square furthest from you, picking up a second loop. 2 loops on hook. Now yarn over and pull through all 2 loops on hook. 1st slip stitch done. 

    Repeat this to the end ensuring that you have joined all stitches to the very corner of the square. 

    Join 4 squares together to make each panel. You should have 6 panels in total. 

    Making up: 

    You should now have 6 panels that consist of 4 squares each. 

    Join panels together using slip stitch. Take the time to ensure that all panels are right sides together when you are joining. The ridge should be on the wrong side of the blanket. 

    The finished blanket should be 4 squares wide and 6 squares long. 

    Border: 

    Working the border is simple. You do exactly the same as you do when you apply a border to each granny square.

    The only difference is that you are making a dc into the dc below, just as you did when practising dc at the beginning. 

    1. Using the border colour, join the new yarn and chain 3 (This is the first dc). Dc in every stitch to the end. Sl st to join the round.

    Repeat once more, 

    You can make your border as thick as you want. I made mine with 2 rounds of navy blue, but I could have easily done 3 or 4. 

    You can now block the blanket if you wish. Just ensure that it lies or hangs flat, and pin the corners to sharpen their angles. 

    Weave in ends and enjoy!